How to Treat Burns at Home: First Aid Guide
By Editorial Team • Published Invalid Date
How to Treat Burns at Home: First Aid Guide
Disclosure: First Aid Kit Spot may earn commissions from qualifying purchases. This does not influence our guidance.
By Editorial Team, reviewed by First Aid Certified Medical Advisors · Last updated March 23, 2026
This is not a substitute for professional medical advice. Seek emergency medical care for severe burns. This guide covers first aid for minor burns only.
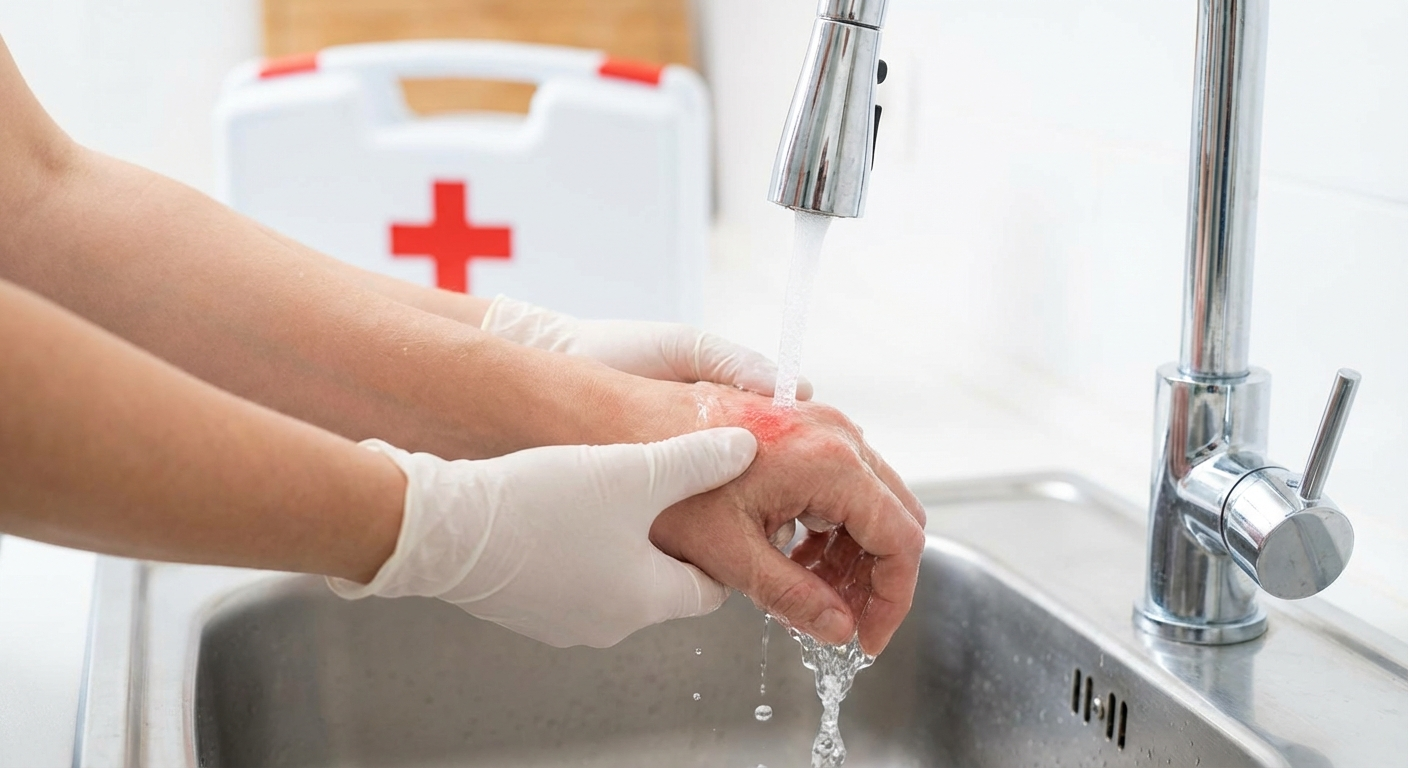
For a minor burn: immediately run cool (not cold) running water over it for 20 minutes, cover with a non-stick sterile dressing, and take a pain reliever if needed. Do not use ice, butter, toothpaste, or any other household remedy — these increase tissue damage. If the burn is larger than 3 inches, is on the face or hands, appears white or charred, or affects a child, go to the emergency room.
Burns are among the most common household injuries in the United States, with over 486,000 burn injuries receiving medical treatment each year according to the American Burn Association. The majority of these — roughly 73% — occur at home, primarily in kitchens and bathrooms. Knowing how to treat minor burns correctly can prevent complications, reduce scarring, and save you an unnecessary trip to the emergency room.
This guide walks you through evidence-based burn first aid: what works, what doesn't, and when a burn requires professional medical attention. If you don't have proper first aid supplies on hand, check our first aid kit checklist to make sure you're prepared before an emergency happens.
Burn Classification: Know Your Burn
Before treating any burn, you need to correctly identify its severity. Burn depth determines whether home treatment is safe or whether you need emergency care. Getting this wrong can lead to serious complications including permanent scarring, infection, and loss of function.
| Degree | Depth | Appearance | Pain Level | Healing Time |
|---|---|---|---|---|
| First degree | Outer skin only (epidermis) | Red, dry, no blisters | Painful to touch | 3-5 days |
| Superficial second degree | Partial thickness (upper dermis) | Red, blistered, moist, blanches with pressure | Very painful | 10-14 days |
| Deep second degree | Deeper partial thickness (lower dermis) | Red/white, large blisters, may not blanch | Less pain (nerve damage) | 3-8 weeks, often scars |
| Third degree | Full thickness (through dermis) | White, brown, or black, dry, leathery | Little to no pain (nerves destroyed) | Requires surgery/grafting |
Key point: Only first-degree burns and small superficial second-degree burns are appropriate for home treatment. Third-degree burns may feel painless because nerves are destroyed — this is a medical emergency, not a sign that the burn is minor.
The "palm rule" is useful for estimating burn size: the palm of the patient's hand (not including fingers) equals roughly 1% of their total body surface area. Any burn larger than 3% body surface area requires medical evaluation.

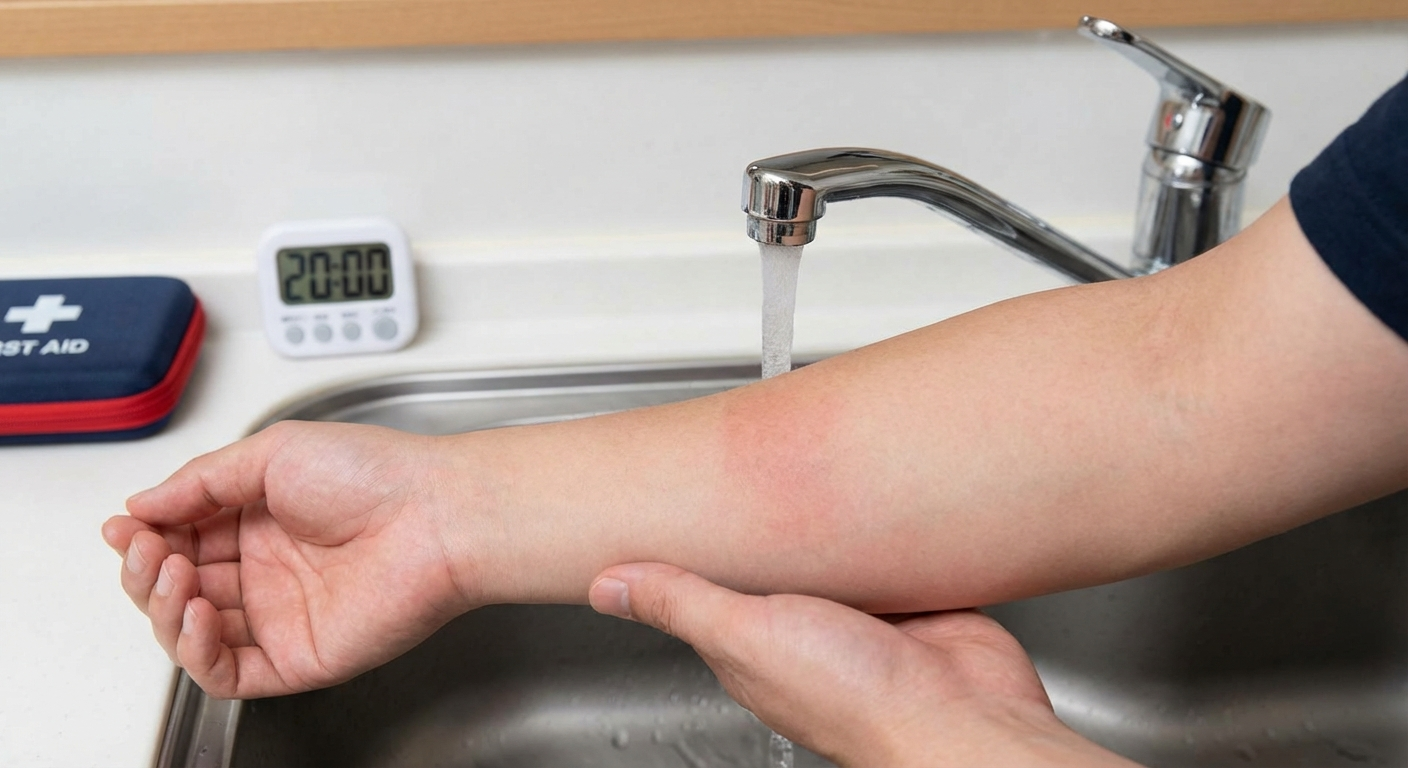
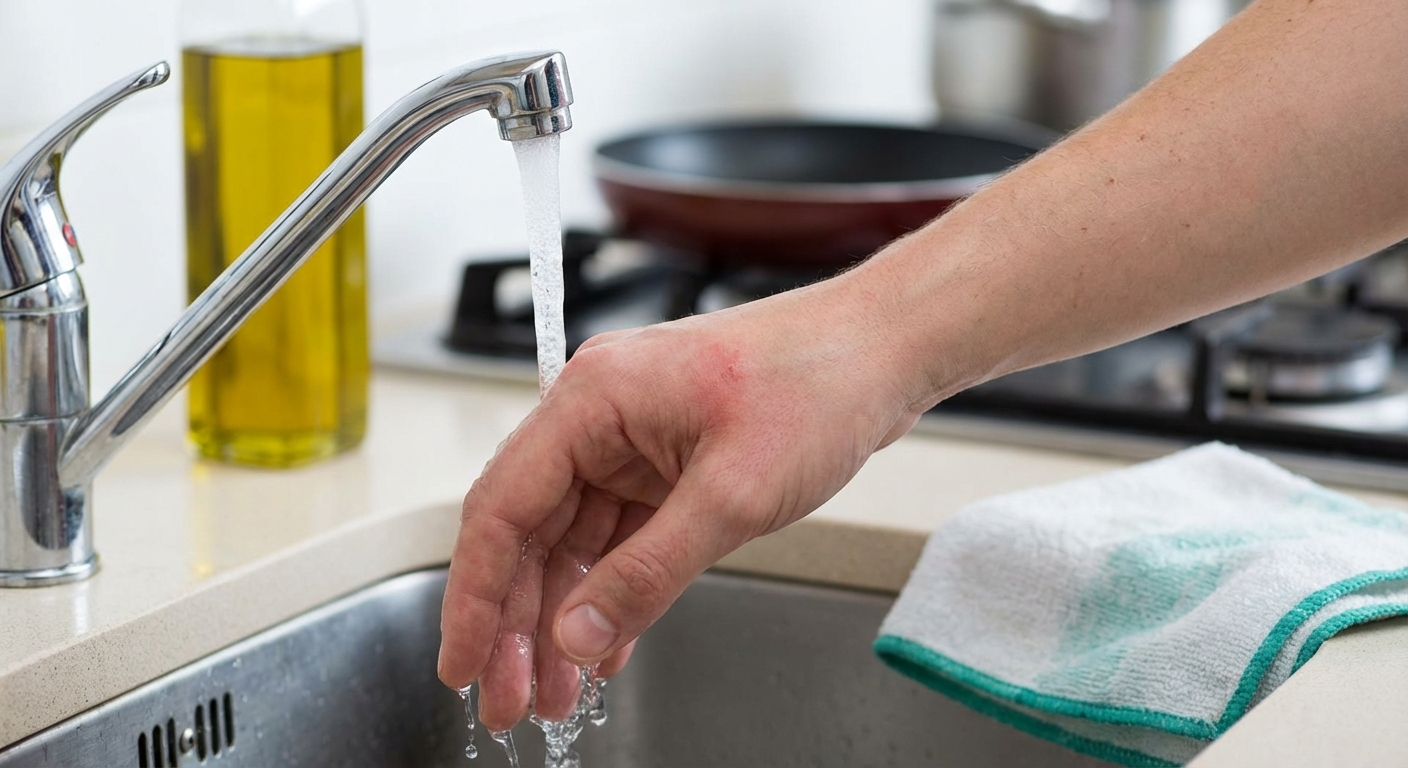
Immediate First Aid: The 20-Minute Rule
The single most important burn first aid action is cooling with running water for 20 minutes. This is supported by every major burns association worldwide, including the American Burn Association, the British Burns Association, and the Australian and New Zealand Burns Association.
Run Cool Running Water for 20 Minutes
Start within 3 minutes of the burn for maximum effectiveness. A 2020 study published in the journal Burns found that burns cooled with running water for 20 minutes within the first three minutes had significantly better outcomes, including reduced need for surgery and shorter hospital stays.
The 20-minute cooling period achieves four critical functions:
- Stops the continuing burning process — heat remains in tissue after the heat source is removed and continues damaging deeper layers. Cool water draws this residual heat out.
- Reduces pain — cooling nerve endings provides immediate analgesic effect without medication.
- Prevents deeper tissue damage — the "zone of stasis" (tissue surrounding the burn center that is damaged but potentially recoverable) is preserved by cooling, preventing the burn from extending.
- Reduces inflammation — cooling limits the inflammatory cascade, which reduces swelling and speeds healing time.
Critical details for effective cooling:
- Use cool water — not ice, not very cold water (cold water constricts blood vessels and impairs healing)
- Running water is significantly more effective than still water in a bowl or bucket
- Target temperature: 15°C (60°F) — comfortably cool, not painful to hold your hand under
- Start as soon as possible; beginning within 3 minutes is ideal but any time within 20 minutes of the burn provides benefit
- Do not stop at 10 minutes because it "feels better" — complete the full 20 minutes for the best outcome
- Remove rings, watches, bracelets, and tight clothing near the burn before swelling makes removal impossible
If running water is unavailable: Use any cool clean water source — a water bottle poured continuously, a clean stream, or even a cool wet towel replaced every 2-3 minutes. The key is consistent cooling for the full duration.
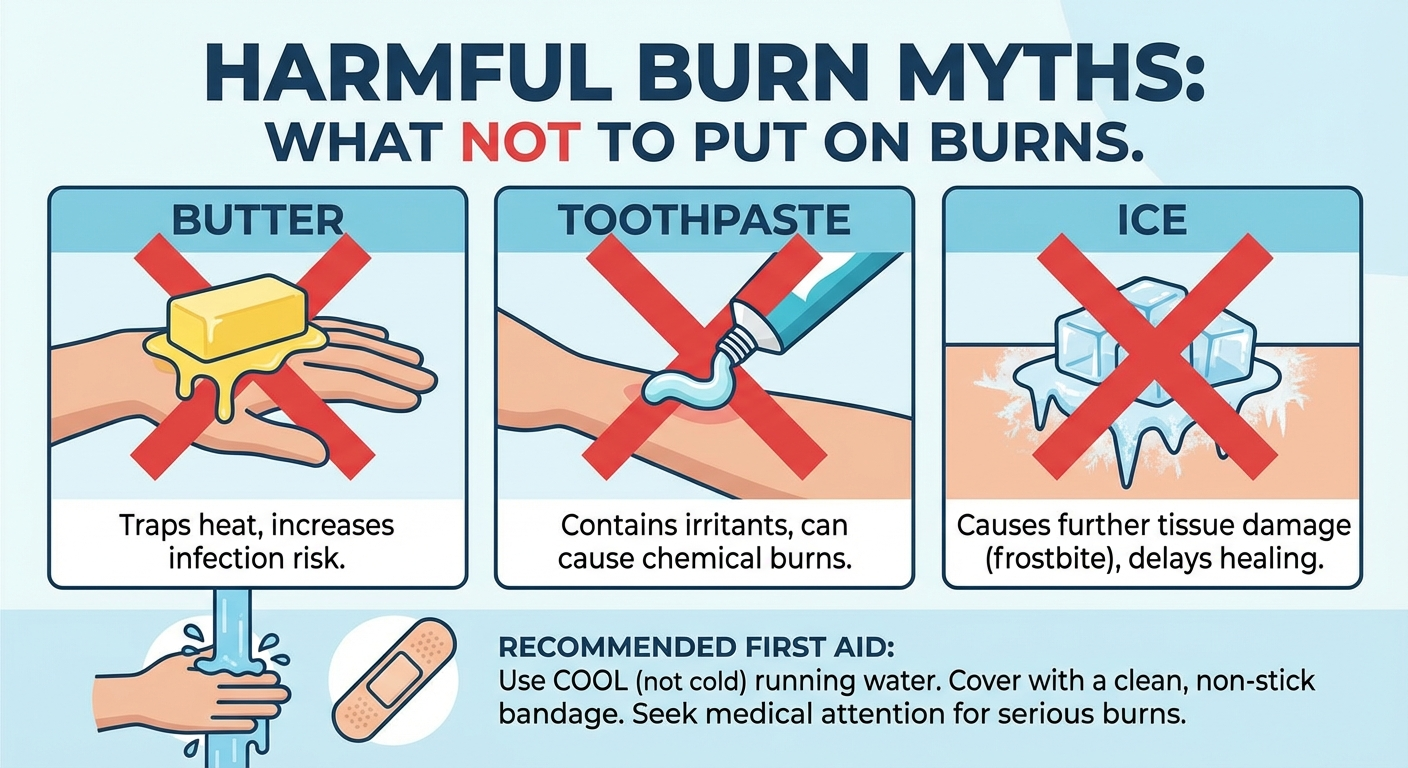
What NOT to Put on a Burn
Myths about burn treatment persist in every culture. These common home remedies not only fail to help — they actively make burns worse and increase the risk of complications. Knowing what to avoid is as important as knowing the correct treatment.
| Don't Use | Why It's Harmful |
|---|---|
| Ice or ice water | Constricts blood vessels, reduces healing blood flow, can cause frostbite on already-damaged tissue, increases tissue necrosis |
| Butter | Retains heat in the wound (continuing tissue damage), creates ideal warm-moist bacterial growth environment, makes clinical assessment harder |
| Coconut oil or olive oil | Same problems as butter — all oils seal heat into tissue and promote bacterial colonization |
| Toothpaste | Contains abrasives (calcium carbonate, silica) that damage healing tissue; menthol creates a false cooling sensation while chemical irritants harm the wound; risk of contact dermatitis |
| Egg white | Salmonella contamination risk on an open wound; no evidence of any benefit; protein denatures and adheres to wound surface |
| Raw honey (unpasteurized) | Botulism spore risk; bacterial contamination. Note: medical-grade Manuka honey (Medihoney) is sterile and used clinically — this is different from kitchen honey |
| Vinegar | Acidic pH causes chemical damage to already-compromised tissue; pain intensification |
| Flour | Traps heat against the burn; contamination risk; creates paste that is painful to remove |
| Aloe vera directly from plant | Unsterilized plant sap carries bacteria; latex layer beneath the leaf can cause irritation. Use pharmacy-grade pure aloe vera gel instead |
The science behind this: Any substance that forms a layer over the burn traps residual heat, which continues the thermal damage process at the cellular level. Oil-based substances are particularly harmful because they are excellent thermal insulators. Additionally, any non-sterile substance applied to a burn introduces bacteria to a wound that has lost its primary defense — intact skin.
Step-by-Step Burn Treatment at Home
For minor first-degree burns and small superficial second-degree burns only:
Step 1: Remove From Heat Source and Cool Immediately (20 Minutes)
Move away from the heat source. If clothing is stuck to the burn, do not pull it off — cut around it. Run cool water over the burn for 20 full minutes. Remove jewelry, watches, and tight clothing near the burn area immediately, before swelling begins.
If the burn was caused by a chemical, brush off any dry chemical first, then flush with running water for at least 20 minutes. Do not attempt to neutralize chemicals — this can cause an exothermic reaction that worsens the burn.
Step 2: Assess the Burn
After cooling, assess the burn under good lighting:
- Size: Smaller than 3 inches (7.5 cm) in diameter — roughly the size of a credit card
- Location: NOT on face, hands, feet, genitals, or over major joints (elbows, knees, ankles, wrists)
- Depth: Red or pink, possibly blistered with clear fluid — NOT white, waxy, brown, or black
- Patient: Adults without complicating conditions — NOT children under 5, elderly over 65, pregnant women, or immunocompromised individuals
If any of these criteria fail, go to the emergency room. Do not attempt home treatment for burns that don't meet all four criteria.
Step 3: Apply Burn Gel or Aloe Vera
Once cooled, gently pat the burn dry with a clean towel (do not rub). Apply a thin layer of:
- Pharmacy-grade burn gel containing lidocaine for pain relief and aloe for soothing
- Pure aloe vera gel (at least 98% pure, fragrance-free) — provides anti-inflammatory benefit
- Antibiotic ointment (Bacitracin preferred over Neosporin for burns, as Neosporin's neomycin component causes allergic reactions in approximately 10% of people)
Step 4: Cover the Burn
- Use non-stick sterile dressings (Telfa, Adaptic, or Mepitel) — these are specifically designed not to adhere to wounds
- Alternatively, use clean cling film (plastic wrap) laid over the burn in sheets, not wrapped around the limb (wrapping restricts swelling and impairs circulation)
- Secure loosely with medical tape on healthy skin — do not apply pressure to the burn
- Do NOT use fluffy cotton wool, gauze pads, or adhesive bandages that touch the burn surface — fibers embed in the wound and are painful to remove
Step 5: Pain Management
- Ibuprofen (Advil, Motrin) is the preferred first-line pain reliever for burns because it combines pain relief with anti-inflammatory action, addressing both symptoms simultaneously
- Acetaminophen/paracetamol (Tylenol) is an alternative for those who cannot take NSAIDs
- Keep the burned area elevated above heart level when possible — this reduces swelling and throbbing pain
- Cool compresses (not ice) can be applied over the dressing for additional comfort
- Do NOT apply anesthetic sprays unless specifically formulated for burns — some contain ingredients that cause allergic contact dermatitis on damaged skin
Step 6: Daily Wound Care (Days 2-14)
- Clean gently with mild soap and lukewarm water daily — do not scrub
- Pat dry and inspect the burn for signs of infection (see infection section below)
- Reapply thin layer of antibiotic ointment or burn gel
- Redress with fresh non-stick sterile dressing
- Do NOT pop blisters — they are sterile biological dressings protecting healing tissue beneath
- If a blister breaks on its own, leave the overlying skin in place as a natural covering, clean gently, apply antibiotic ointment, and cover
Step 7: Monitor and Follow Up
- Pain should steadily decrease over the first 48-72 hours
- First-degree burns should show visible improvement by day 3
- Superficial second-degree burns should begin re-epithelialization (new skin growth from wound edges) by day 7
- If healing stalls or the wound looks worse at any point, seek medical evaluation
If you need to build or restock your home first aid kit with burn supplies, our guide on what every first aid kit should contain includes a complete supply checklist.
Kitchen Burns: The Most Common Home Burns
The kitchen is the number one location for burn injuries in the home. According to the National Fire Protection Association, cooking equipment is involved in nearly half of all reported home fires and the vast majority of non-fire burn injuries. Understanding the specific risks helps you respond faster and prevent future incidents.
Common Kitchen Burn Scenarios
Hot liquid scalds (most common): Boiling water, soup, coffee, and steam cause the majority of kitchen burns. Scalds spread quickly over a large area because liquid flows across the skin. A spilled cup of coffee at serving temperature (70-80°C / 160-175°F) can cause a full-thickness burn in under one second on a child's skin.
Oil and grease splatter: Cooking oil reaches temperatures of 175-230°C (350-450°F) — far higher than boiling water. Oil burns tend to be deeper than water scalds at the same contact duration because of the higher heat transfer. Additionally, oil adheres to skin rather than running off, prolonging contact time.
Contact burns from hot surfaces: Touching oven racks, hot pan handles, stovetops, and heated bakeware. These burns are usually small but can be deep, especially from cast iron or stainless steel which retain heat effectively.
Steam burns: Steam at 100°C carries significantly more thermal energy than boiling water at the same temperature because of latent heat. Opening a pot lid toward your face, venting a microwave container, or draining pasta without directing steam away from your body are common causes.
Kitchen Burn Prevention Tips
- Turn pot handles toward the back of the stove so they cannot be knocked or grabbed by children
- Use oven mitts — not towels, which can be damp (steam burns) or catch fire
- Open microwave containers and pot lids away from your face, tilting the far side up first
- Keep a Class K fire extinguisher (rated for cooking oils) accessible in the kitchen
- Never carry boiling pots of water across the kitchen — turn off the heat and wait, or use a colander in the sink
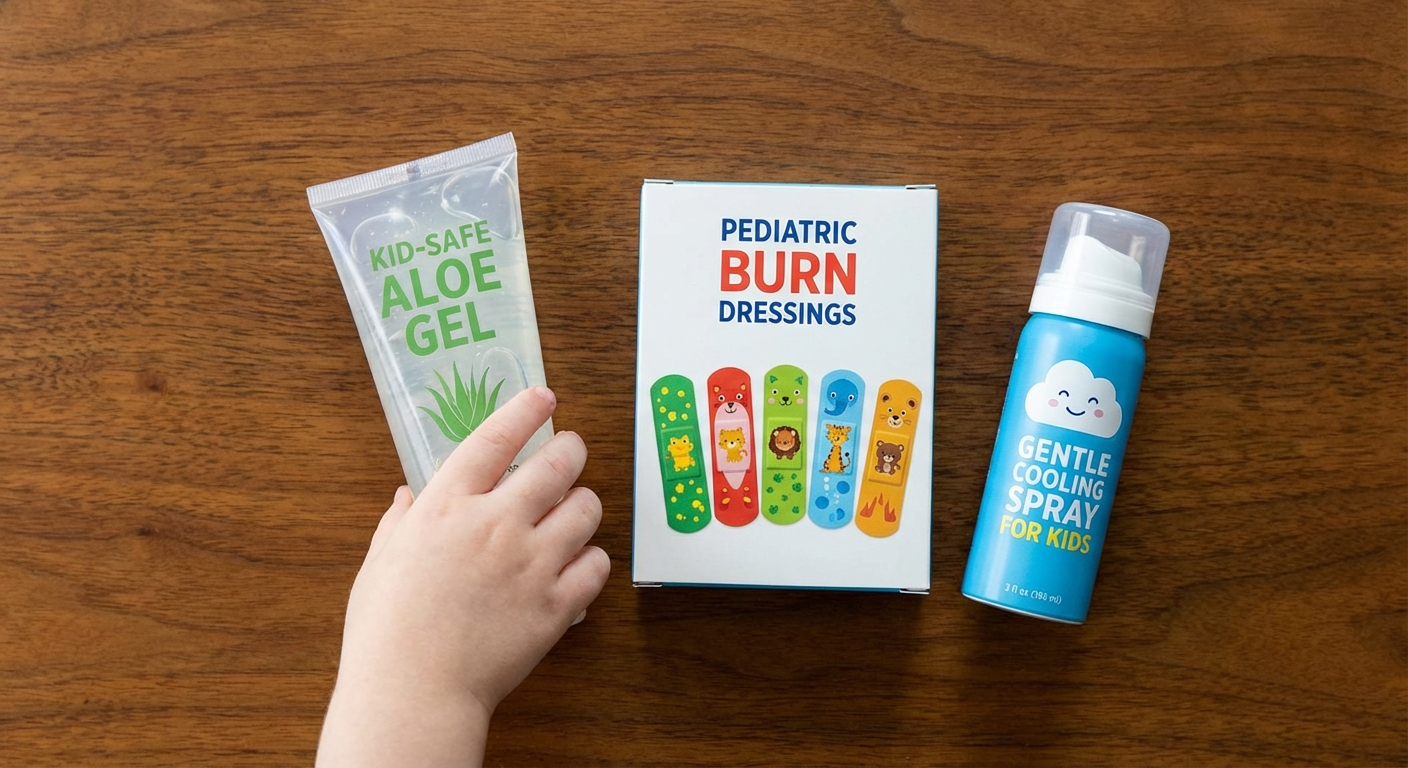
Treating Burns in Children
Burns are the third leading cause of injury-related death in children under 14. Children's skin is thinner than adult skin, meaning the same heat exposure causes deeper burns in less time. A cup of hot coffee that causes a first-degree burn on an adult can cause a full-thickness third-degree burn on a toddler.
Key Differences for Pediatric Burns
- Lower threshold for ER: Any burn in a child under 5 years old should be evaluated by a medical professional, regardless of size or apparent severity
- Higher infection risk: Children's immune systems are still developing, making burn infections more likely and more dangerous
- Greater fluid loss risk: Children have a higher body-surface-area-to-weight ratio, meaning burns cause proportionally greater fluid loss. Dehydration can develop quickly
- Pain management differs: Do not give aspirin to children under 16 (risk of Reye's syndrome). Use children's ibuprofen or acetaminophen at weight-appropriate doses
Immediate First Aid for Child Burns
- Cool with running water for 20 minutes — same as adults, but monitor the child for hypothermia (shivering, blue lips). Wrap unburned areas in a warm blanket if needed while cooling the burn
- Do not remove stuck clothing — cut around it
- Keep the child calm — pain and fear together can cause shock in young children
- Cover loosely with cling film or a clean, non-fluffy cloth
- Seek medical evaluation for any burn in a child — even burns that appear minor. Children's skin damage is often deeper than surface appearance suggests
Scald Prevention for Families with Children
- Set your hot water heater to 49°C (120°F) maximum — water at 60°C (140°F) causes a third-degree burn in 5 seconds on a child
- Never hold a child while drinking or carrying hot beverages
- Use back burners on the stove and turn handles inward
- Keep mugs and cups of hot liquid away from table edges
- Test bath water with your elbow (more temperature-sensitive than hands) before placing a child in the tub
For families with young children, having a properly stocked first aid kit is non-negotiable. Our best first aid kits for home guide covers kits that include pediatric-appropriate supplies.
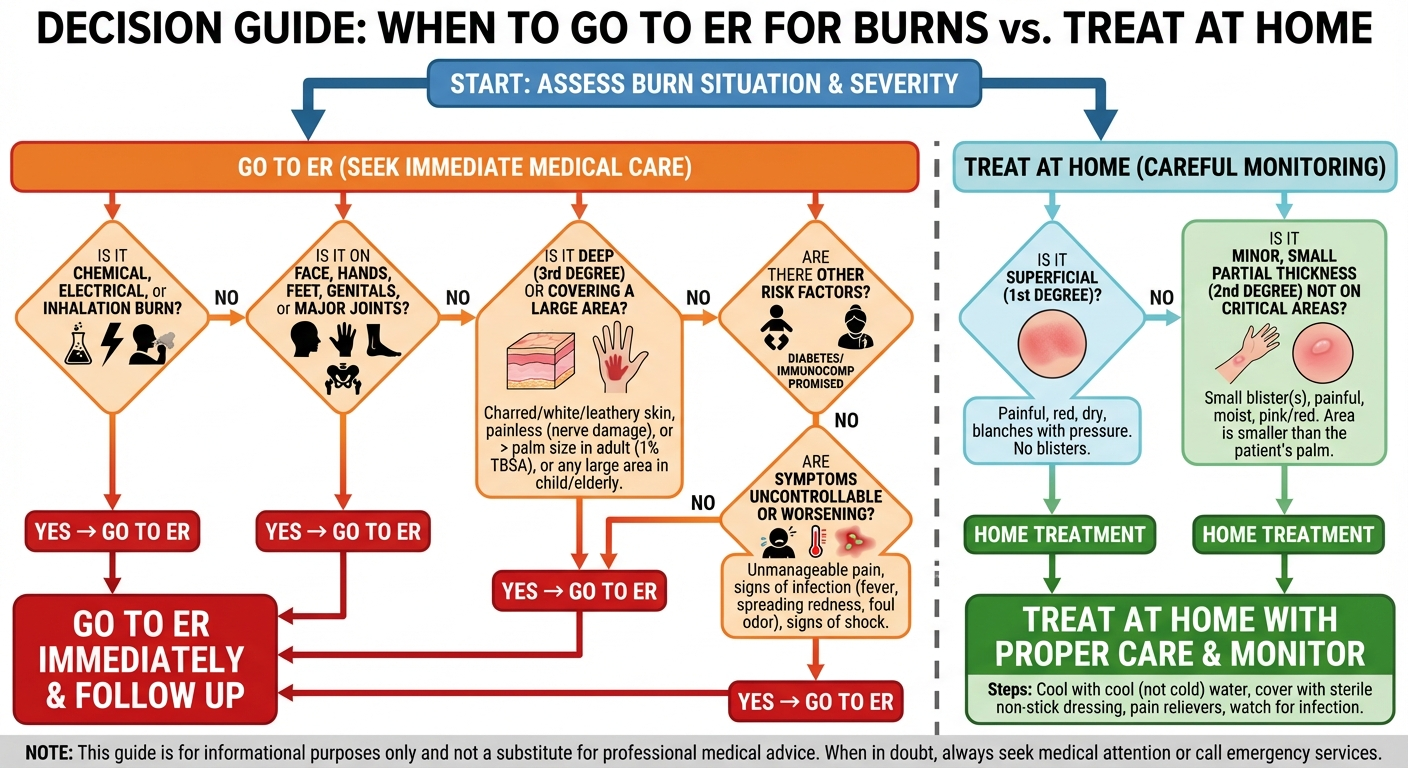
When to Go to the Emergency Room
Not every burn can be safely managed at home. Delaying emergency care for a serious burn causes irreversible tissue damage and dramatically increases complication risk. When in doubt, always err on the side of seeking medical care.
Go to the ER immediately for:
- Burns larger than 3 inches (7.5 cm) in diameter, or larger than the patient's palm
- Burns on high-risk locations: face, hands, feet, genitals, perineum, or over major joints
- Burns that appear white, waxy, brown, or black (indicating third-degree/full-thickness damage)
- Burns that circle entirely around a limb, finger, or toe (circumferential burns — risk of compartment syndrome as swelling cuts off blood flow)
- Chemical burns — flush continuously with water during transport
- Electrical burns — these can have hidden internal tissue damage far worse than the surface wound. Electrical burns can also cause cardiac arrhythmia
- Any burn involving smoke inhalation, facial soot, singed nasal hairs, or breathing difficulty
- Burns in vulnerable populations: children under 5, adults over 65, pregnant women, people with diabetes, immunocompromised individuals
- Any burn that you are uncertain about — it is always safer to have a professional assess
Call 911 (or emergency services) for:
- Burns covering more than 10% body surface area (roughly 10 palm-sized areas)
- Burns with respiratory symptoms: coughing, hoarse voice, difficulty breathing, stridor
- Electrical burns from high voltage sources (household current and above)
- Any burn accompanied by loss of consciousness, confusion, or signs of shock (pale skin, rapid pulse, dizziness)
- Chemical burns to the eyes
Preventing Burn Infection
Burns destroy the skin's barrier function, making the wound highly susceptible to bacterial colonization. Burn wound infections are one of the most common and dangerous complications, potentially leading to cellulitis, sepsis, and in severe cases, toxic shock syndrome. Prevention starts immediately after the initial first aid treatment.
What reduces infection risk:
- Antibiotic ointment (Bacitracin) applied as a thin layer daily — evidence supports topical antibiotic use for minor burns to reduce infection rates by up to 50%
- Non-stick sterile dressings changed every 24 hours, or sooner if they become wet or soiled
- Gentle daily cleaning with mild liquid soap and clean lukewarm water — do not use hydrogen peroxide or rubbing alcohol, which damage healing tissue
- Moist wound healing — keeping the burn covered and lightly moist heals faster and produces less scarring than dry healing (supported by Cochrane review evidence)
- Hand hygiene — wash hands thoroughly with soap and water before every dressing change
- Avoiding submersion — do not soak burns in bath water, swimming pools, or hot tubs until fully healed. Shower water running over the burn is acceptable
What increases infection risk:
- Applying non-sterile home remedies (butter, oils, toothpaste) — these introduce bacteria directly to a compromised wound
- Popping blisters — removes the body's natural sterile biological dressing
- Leaving burns uncovered and exposed to environmental bacteria
- Neglecting dressing changes — old dressings harbor bacteria
- Scratching the healing burn — introduces bacteria from under fingernails and damages fragile new tissue
- Using non-sterile dressing materials (torn t-shirts, paper towels, tissue paper)
Recognizing Burn Infection: Warning Signs
Seek medical care immediately if you notice any of the following:
- Increasing pain after the first 24 hours — burn pain should steadily decrease, not increase
- Expanding redness beyond the original burn margins — a red border spreading outward indicates cellulitis
- Swelling and warmth increasing after the first 48 hours
- Purulent discharge — yellow, green, or foul-smelling fluid from the wound
- Fever above 38°C (100.4°F) — systemic sign of infection
- Red streaks radiating from the wound toward the heart — indicates lymphangitis, a spreading infection requiring urgent antibiotics
- Delayed healing — no improvement or worsening appearance after 5-7 days for a first-degree burn
Burn Healing Timeline and Scar Prevention
Understanding the normal healing timeline helps you identify when something is going wrong. Burns heal in three overlapping phases: inflammation, proliferation, and remodeling.
Normal Healing Phases
Inflammation phase (Days 1-5): Redness, swelling, warmth, and pain are normal during this phase. The body is clearing damaged cells and delivering immune cells to prevent infection. Swelling typically peaks at 48-72 hours and then begins to decrease.
Proliferation phase (Days 3-21): New skin cells grow inward from the wound edges and upward from surviving hair follicles and sweat glands in the wound bed. Blisters flatten and are gradually reabsorbed. Pink, fragile new skin (granulation tissue) becomes visible. The wound contracts and closes.
Remodeling phase (Weeks 3 to 12+ months): The new skin strengthens and matures. Initial bright pink or red coloration gradually fades. Scar tissue is reorganized. This phase continues long after the wound appears "healed" — the new skin remains fragile and sun-sensitive for months.
Scar Prevention Strategies
- Keep the healed burn out of direct sunlight for at least 12 months — new skin is extremely vulnerable to UV damage and hyperpigmentation. Use SPF 50+ sunscreen or cover with clothing
- Silicone-based scar sheets or gel (e.g., ScarAway, Mederma) — applied to healed skin (not open wounds), silicone sheets are the most evidence-supported over-the-counter scar treatment
- Moisturize frequently — healed burn skin is prone to dryness and cracking. Unscented moisturizers (CeraVe, Eucerin) applied 2-3 times daily help maintain skin elasticity
- Gentle massage — once the wound is fully closed and no longer tender, gentle circular massage of the scar tissue for 5 minutes twice daily can help break down collagen cross-links and improve scar pliability
- Avoid picking or scratching — healing burns itch intensely. Use antihistamines (diphenhydramine/Benadryl) or cool compresses for itch relief rather than scratching

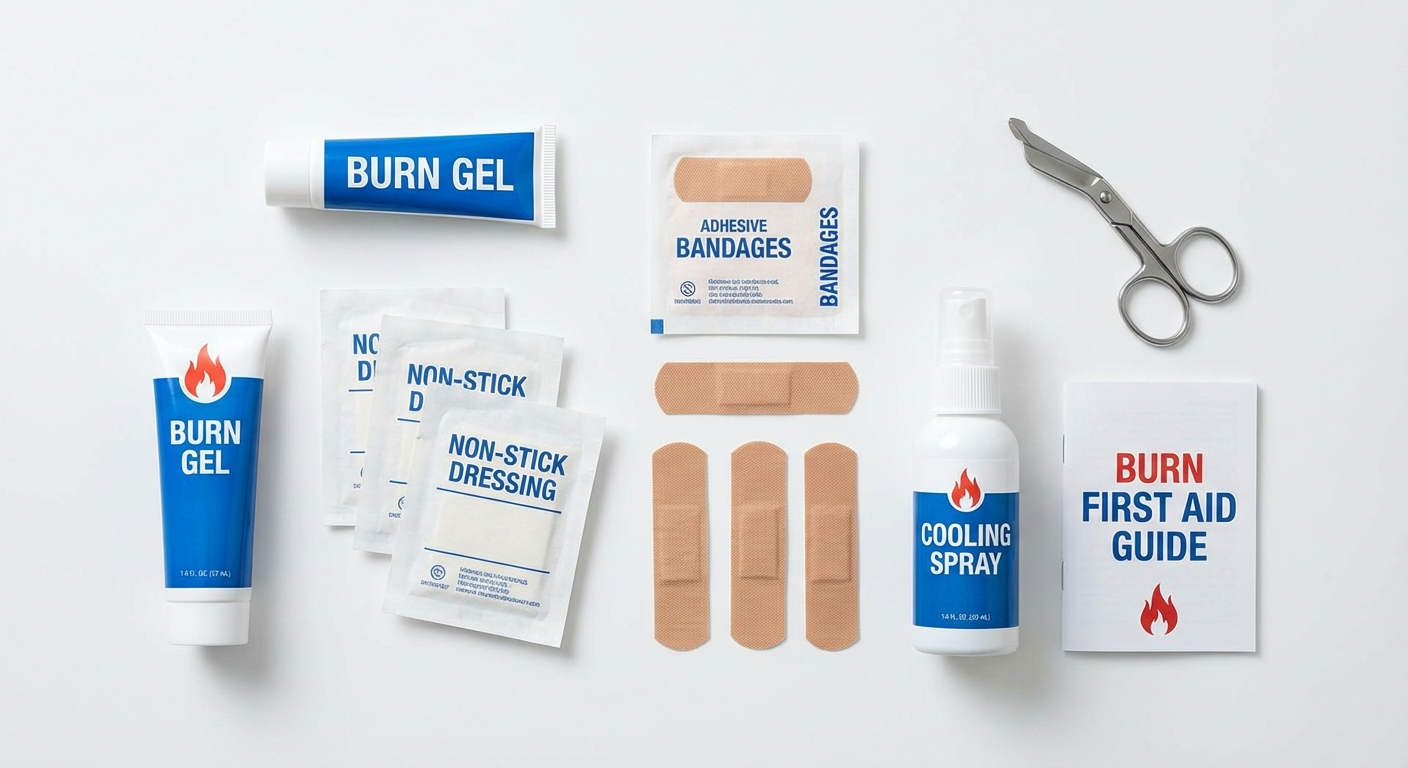
Best Products for Burn First Aid
Having the right supplies on hand before a burn occurs means faster, more effective treatment. These are the product categories you should stock in your home first aid kit. For a complete kit overview, see our guide to the best first aid kits for home.
Non-Stick Burn Dressings
Telfa, Adaptic, or Mepitel non-stick wound dressings — critical for burns to prevent tearing healing tissue during dressing changes
View on AmazonBacitracin Antibiotic Ointment
Preferred over Neosporin for burns — Bacitracin reduces infection without the neomycin allergy risk. Apply thin layer before each dressing change.
View on AmazonPure Aloe Vera Gel
Pharmacy-grade 99% pure aloe vera gel (fragrance-free) provides anti-inflammatory relief for first-degree burns. Look for products with minimal additives.
View on AmazonBurn Gel with Lidocaine
Water-based burn gels containing lidocaine provide immediate topical pain relief. Water Jel and Burnfree are widely used by EMS professionals.
View on AmazonSilicone Scar Sheets
ScarAway or Mepiform medical-grade silicone sheets — the most evidence-supported OTC scar treatment. Apply to fully healed burns for 8-12 weeks.
View on AmazonProduct Comparison: Burn Treatment Supplies
To help you choose the right supplies, here's a direct comparison of the most effective burn treatment products for your home first aid kit.
| Product | Type | Best For | Key Feature | Approx. Price |
|---|---|---|---|---|
| Water Jel Burn Gel | Topical burn gel | Immediate pain relief after cooling | Water-based gel with lidocaine; used by firefighters and EMS; cools and soothes without trapping heat | $8-12 |
| Telfa Non-Stick Pads | Non-adherent dressing | Covering burns during healing | Cotton pad with non-stick coating; won't tear new skin during removal; available in multiple sizes | $5-9 |
| Bacitracin Zinc Ointment | Antibiotic ointment | Infection prevention | Single antibiotic (lower allergy risk than triple-antibiotic); proven effective for minor burn infection prevention | $4-7 |
| Seven Minerals Aloe Vera Gel | Pure aloe gel | Soothing first-degree burns | 99% organic aloe vera; no added fragrance or color; provides anti-inflammatory and moisturizing benefit | $10-15 |
| ScarAway Silicone Sheets | Scar treatment | Post-healing scar reduction | Medical-grade silicone; clinically proven to flatten and fade scars; reusable sheets worn 12+ hours/day | $15-25 |
| Burnfree Pain Relieving Gel | Emergency burn gel | First responder-grade treatment | Water-soluble gel with tea tree oil; stops burn progression; individually wrapped sachets ideal for kits | $10-18 |
| Coban Self-Adherent Wrap | Securing dressings | Holding burn dressings in place | Sticks to itself without adhesive — won't pull on burned skin. Flexible, breathable, easy to apply one-handed | $6-10 |
Our recommendation: At minimum, stock non-stick dressings, Bacitracin ointment, and a burn gel. The total cost is under $25 and covers the critical supplies for treating a minor burn effectively at home. A dedicated burn first aid kit that includes all of these supplies is included in our CPR and first aid guide as part of our recommended emergency preparedness supplies.
Frequently Asked Questions
What is the first thing to do for a burn?
Immediately run cool (not cold) running water over the burn for 20 minutes. This is the single most effective immediate treatment — it stops the burning process, reduces pain, and prevents deeper tissue damage. Do not use ice, butter, toothpaste, or any other household remedy. After cooling, cover with a non-stick sterile dressing.
Should I pop a burn blister?
No — blisters are the body's natural sterile protective covering for healing tissue underneath. Popping them removes this protection, exposes raw tissue to bacteria, and significantly increases infection risk. If a blister breaks on its own, leave the overlying skin in place, clean gently with mild soap and water, apply antibiotic ointment, and cover with a sterile non-stick dressing.
Is butter good for burns?
No — butter is actively harmful on burns and should never be applied. Butter retains heat in the wound (continuing tissue damage), creates an ideal warm, moist environment for bacterial growth, and makes clinical assessment more difficult if you do end up needing medical care. The same applies to all oils, including coconut oil and olive oil.
Can I use ice on a burn?
No — never use ice or ice water on a burn. Ice constricts blood vessels, dramatically reducing blood flow to the damaged tissue that needs it most for healing. Ice can also cause frostbite on tissue that is already compromised. Use cool (not cold) running water at approximately 15°C (60°F) for 20 minutes instead.
When should I go to the ER for a burn?
Burns larger than 3 inches, on the face/hands/feet/genitals, appearing white or black, in children under 5 or elderly over 65, chemical or electrical burns, circumferential burns that wrap around a body part, or any burn with breathing difficulty all require emergency medical care. When in doubt, seek medical evaluation — it is always safer to have a professional assess a burn.
How long does a minor burn take to heal?
First-degree burns: 3-5 days. Superficial second-degree burns with intact blisters: 10-14 days. Deep second-degree burns: 3-8 weeks, often with scarring. Third-degree burns require medical treatment and often skin grafting. Full scar maturation from any burn takes up to 12 months.
How do I treat a kitchen burn from cooking oil?
Treat oil burns the same as any thermal burn: immediately run cool water for 20 minutes. However, be aware that oil burns are often deeper than they initially appear because cooking oil reaches much higher temperatures (175-230°C) than boiling water. Monitor oil burns closely over the first 48 hours for signs of deeper tissue damage, and lower your threshold for seeking medical evaluation.
What should I put on a burn after the first 20 minutes?
After the 20-minute cooling period: gently pat dry, apply a thin layer of pharmacy-grade burn gel or pure aloe vera gel, then cover with a non-stick sterile dressing. For ongoing daily care, apply Bacitracin antibiotic ointment and fresh dressings. Do not apply any substance that is not specifically designed for wound care.
When should I worry about a burn getting infected?
Warning signs of burn infection include: increasing pain after 24 hours (it should be decreasing), redness spreading beyond the burn area, swelling and warmth increasing after 48 hours, yellow or green discharge, fever above 38°C (100.4°F), and red streaks radiating from the wound. Any of these signs require immediate medical attention — burn infections can progress rapidly to systemic illness.
Sources and Methodology
Clinical References:
- Australian and New Zealand Burns Association (ANZBA): First Aid guidelines for burns — anzba.org.au
- NHS: Burns and scalds first aid guide — nhs.uk
- American Burn Association: Clinical practice guidelines — ameriburn.org
- Wasiak J, et al. "Dressings for superficial and partial thickness burns." Cochrane Database of Systematic Reviews, 2013.
- Cuttle L, et al. "A Systematic Review of First Aid Treatments for Burn Injuries." Burns, 2009; 35(6): 768-775.
- Wood FM, et al. "Water First Aid is Beneficial in Humans Post-Burn: Evidence from a Bi-National Cohort Study." PLOS ONE, 2016.
- National Fire Protection Association (NFPA): Home fire and burn injury statistics — nfpa.org
- World Health Organization: Burns fact sheet — who.int
Important Disclaimer: This guide is for educational purposes only. It does not replace professional medical advice, diagnosis, or treatment. Always seek emergency care for serious burns, and consult a healthcare professional if you have any concerns about a burn injury.
By Editorial Team, reviewed by First Aid Certified Medical Advisors
Last updated March 23, 2026.