CPR Guide for Adults: Step-by-Step (2026)
By Dr. Karen Walsh, Emergency Medicine Specialist • Published 3/22/2026
CPR Guide for Adults: Step-by-Step (2026)
CPR (cardiopulmonary resuscitation) for adults involves calling 911, placing the heel of your hand on the center of the chest, pushing hard and fast at a rate of 100-120 compressions per minute at a depth of at least 2 inches, and delivering rescue breaths at a ratio of 30 compressions to 2 breaths. Hands-only CPR (compressions without breaths) is recommended for untrained bystanders.
This article contains affiliate links. If you purchase through our links, we may earn a small commission at no extra cost to you. This helps us keep creating free, life-saving educational content. See our full affiliate disclosure.
By Dr. Karen Walsh, Emergency Medicine Specialist · Last updated March 2026
IMPORTANT DISCLAIMER: This guide is for educational purposes only. It does not replace hands-on CPR training. Reading about CPR is valuable, but practicing on a mannequin under professional supervision is essential for building the muscle memory and confidence needed in a real emergency. Get certified through the American Heart Association or American Red Cross. Many local fire departments and community colleges also offer affordable CPR certification courses.
Table of Contents
- What Is CPR and Why It Matters
- When to Perform CPR
- Step-by-Step Adult CPR Guide
- Hands-Only CPR: When and How
- Using an AED with CPR
- Common CPR Mistakes and How to Avoid Them
- When to Stop CPR
- Essential CPR Supplies and Training Equipment
- FAQs
- Author Bio
- Sources and Methodology
What Is CPR and Why It Matters
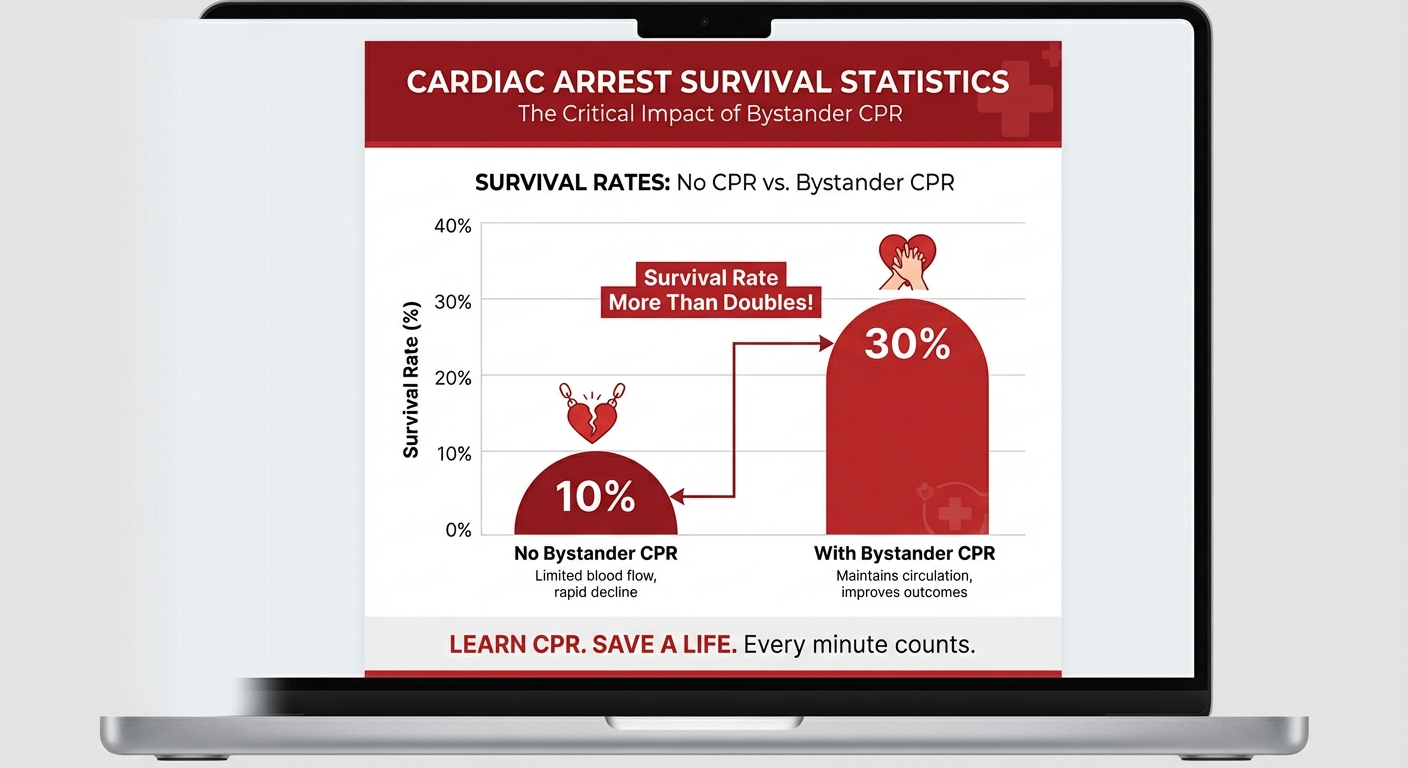
Cardiac arrest kills more than 350,000 Americans outside of hospitals every year, according to the American Heart Association. When someone's heart stops beating, every minute without CPR reduces their chance of survival by 7 to 10 percent. After just 4 to 6 minutes without oxygen-rich blood flowing to the brain, permanent brain damage begins.
CPR — cardiopulmonary resuscitation — is a life-saving technique that manually pumps blood through the body when the heart can no longer do it on its own. By pushing hard and fast on the chest (compressions) and optionally delivering breaths into the lungs (ventilations), a bystander can keep oxygenated blood circulating to the brain, heart, and other vital organs until emergency medical services arrive with advanced equipment.
The critical fact that most people do not realize is this: CPR performed by a bystander can double or even triple a cardiac arrest victim's chance of survival. Despite this, fewer than 40 percent of out-of-hospital cardiac arrest victims receive bystander CPR. The most common reason people give for not performing CPR is fear — fear of doing it wrong, fear of hurting the person, fear of legal consequences.
Here is the truth: you cannot make it worse. A person in cardiac arrest is clinically dead. Their heart has stopped. Without intervention, they will remain dead. Imperfect CPR is dramatically better than no CPR at all. Every major medical organization in the world — the AHA, the Red Cross, the European Resuscitation Council — agrees on this point.
This guide walks you through everything you need to know about performing CPR on an adult, step by step, following the most current 2026 guidelines from the American Heart Association and the American Red Cross. Whether you are completely untrained or looking to refresh skills you learned years ago, this guide will give you the knowledge and confidence to act when it matters most.
If you are building a home emergency preparedness setup, make sure you also have a properly stocked first aid kit. Our complete first aid kit checklist for 2026 covers everything your kit should contain, including CPR face shields and pocket masks.
When to Perform CPR
Not every medical emergency requires CPR. Performing CPR on someone who does not need it — someone whose heart is still beating — can cause unnecessary injury. Knowing when to start CPR is just as important as knowing how.
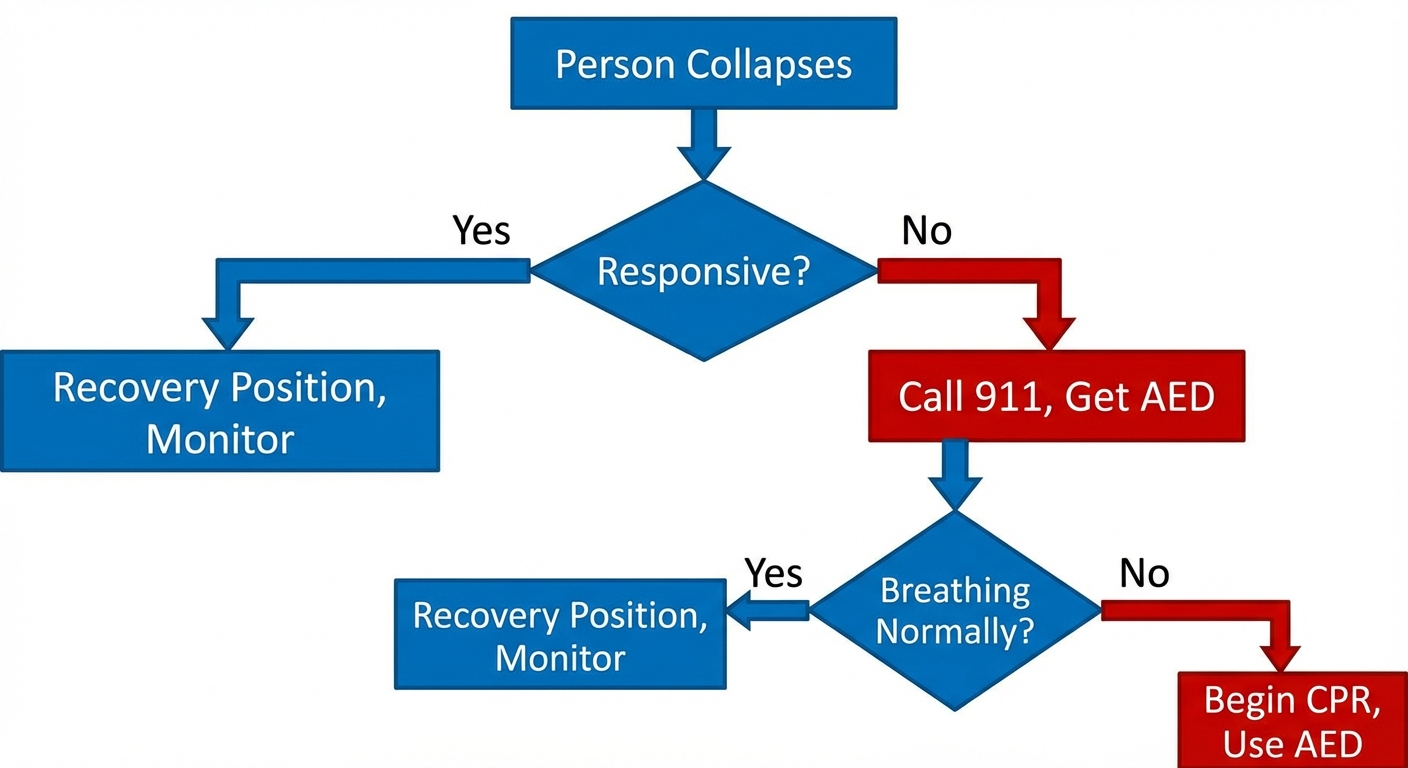
Perform CPR when all three of these conditions are present:
-
The person is unresponsive. They do not react when you tap their shoulders firmly and shout "Are you OK?" They do not open their eyes, speak, or move purposefully.
-
The person is not breathing normally. They are either not breathing at all, or they are making occasional gasping sounds (called agonal breathing). Agonal breathing is not real breathing — it is a reflex that occurs in the early minutes of cardiac arrest. It sounds like snoring, gurgling, or irregular gasps. If you see agonal breathing, treat it as no breathing and begin CPR.
-
The person has no pulse (optional check). The AHA now recommends that untrained rescuers skip the pulse check entirely and rely on responsiveness and breathing assessment alone. If you are trained, you can check for a carotid pulse for no more than 10 seconds. If you do not feel a definite pulse within 10 seconds, begin CPR.
Do NOT perform CPR if:
- The person is conscious and responsive
- The person is breathing normally (even if they are unconscious — place them in the recovery position instead)
- There is a valid Do Not Resuscitate (DNR) order present
- The scene is too dangerous for you to safely approach (fire, electrical hazard, structural collapse, active violence)
When in doubt, start CPR. The risk of performing unnecessary compressions on someone who does not need them is far lower than the risk of withholding CPR from someone who does. Medical professionals can sort out the details when they arrive.
Step-by-Step Adult CPR Guide
The following steps apply to adult victims (anyone who has gone through puberty or older). CPR for infants and children follows a similar sequence but with different hand placement and compression depth — those are covered in a separate guide.
Step 1: Check the Scene and the Person
Before you touch the victim, take 5 seconds to scan the environment. Look for immediate dangers: traffic, fire, electrical hazards, chemical spills, unstable structures, or hostile people. You cannot help anyone if you become a victim yourself.
Once the scene is safe, approach the person and check for responsiveness:
- Tap both shoulders firmly and shout loudly: "Are you OK? Are you OK?"
- Look for any response — eye opening, movement, verbal response, moaning
- If the person is face down, carefully roll them onto their back (support the head and neck as you roll)
If the person does not respond to your shouting and tapping, they are unresponsive. Move immediately to Step 2.

Step 2: Call 911
Call 911 immediately or, better yet, delegate the call. If other people are present, point to a specific person and say: "You — call 911 and tell them someone is in cardiac arrest. Come back and tell me when they are on the way." Being specific prevents the bystander effect, where everyone assumes someone else will make the call.
If you are alone:
- Put your phone on speaker and place it next to you so you can begin CPR while talking to the dispatcher
- The 911 dispatcher can coach you through CPR in real time — this is called Telephone CPR (T-CPR) and has been shown to significantly improve outcomes
- If no phone is available, perform 2 minutes of CPR first (5 cycles of 30:2), then go call 911 and return
Also request an AED. Tell the dispatcher or bystanders: "We need an AED — check the nearest building for one." AEDs are commonly found in airports, gyms, schools, offices, shopping centers, and other public buildings. They are often in wall-mounted cases near entrances or elevators.
Step 3: Open the Airway
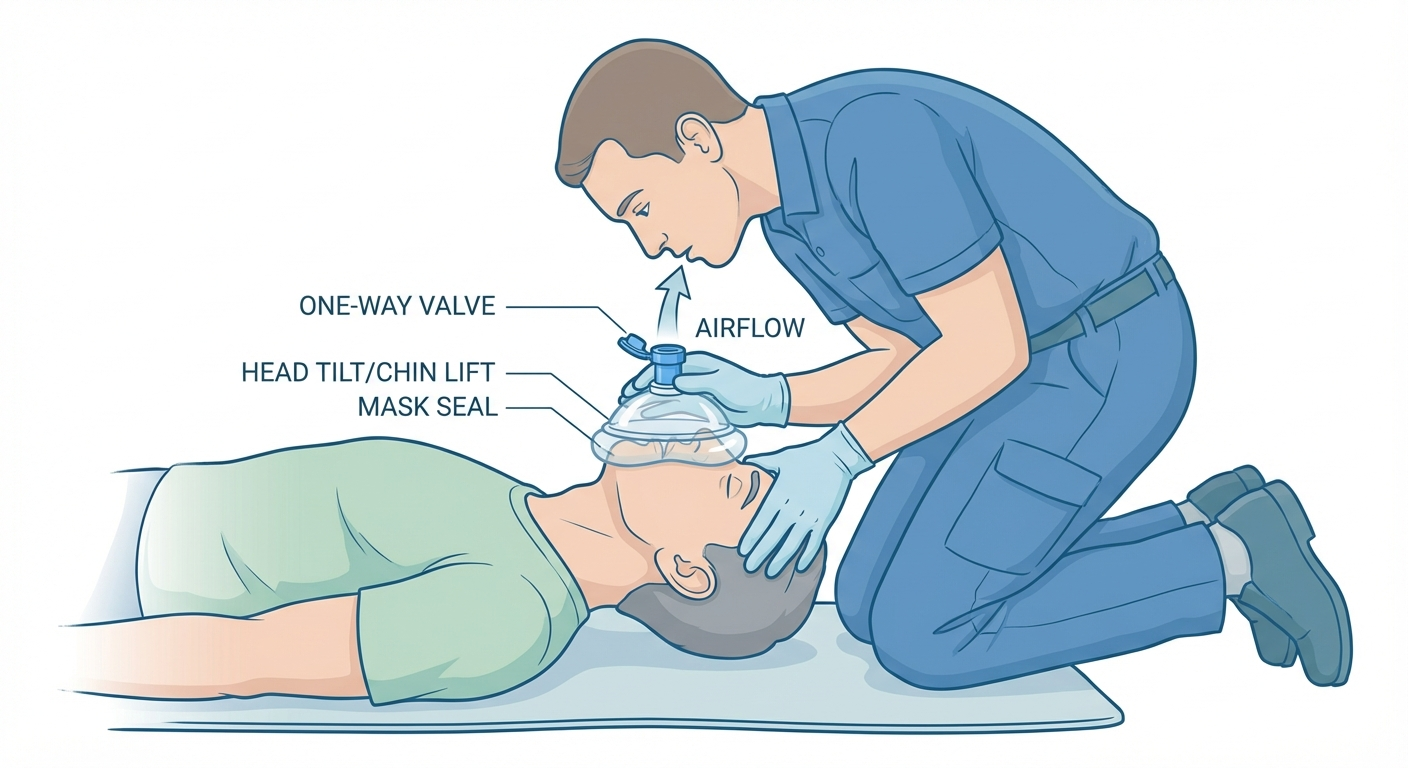
With the person lying flat on their back on a firm surface (not a bed or couch — move them to the floor if possible), open their airway using the head-tilt, chin-lift maneuver:
- Place one hand on the person's forehead
- Place two fingers of your other hand under the bony part of their chin
- Gently tilt the head back while lifting the chin upward
- This moves the tongue away from the back of the throat, opening the airway
If you suspect a spinal injury (fall from height, car accident, diving injury), use the jaw-thrust maneuver instead: place your fingers behind the angles of the lower jaw on both sides and push the jaw forward without tilting the head.
Step 4: Check for Breathing
With the airway open, check for normal breathing for no more than 10 seconds:
- Look at the chest for rise and fall
- Listen for breath sounds by placing your ear near the person's mouth
- Feel for air on your cheek
If the person is not breathing at all, or is only gasping (agonal breathing), they need CPR. Do not waste time — every second counts. Begin chest compressions immediately.
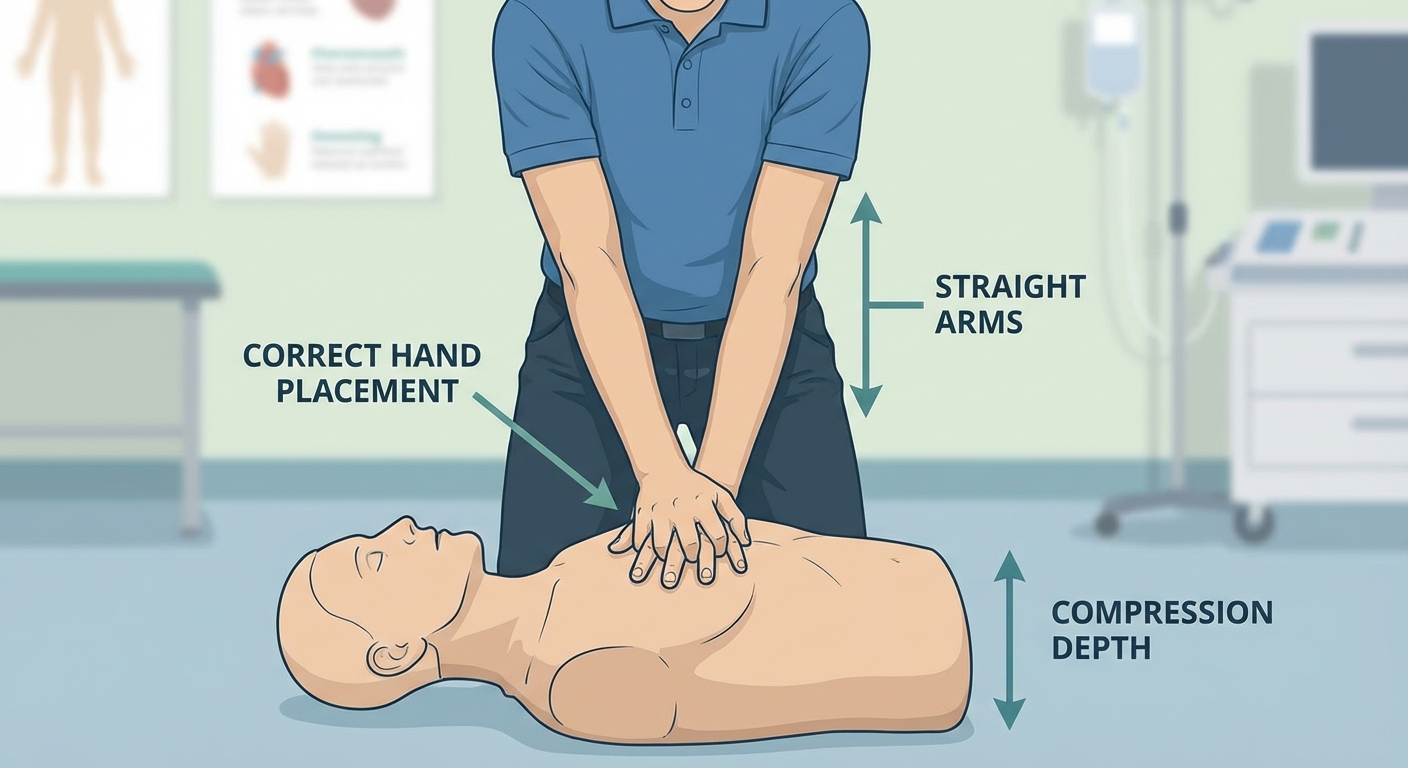
Step 5: Begin Chest Compressions
Chest compressions are the single most important component of CPR. High-quality compressions keep blood flowing to the brain and heart, buying time until an AED or advanced medical care arrives.
Hand placement:
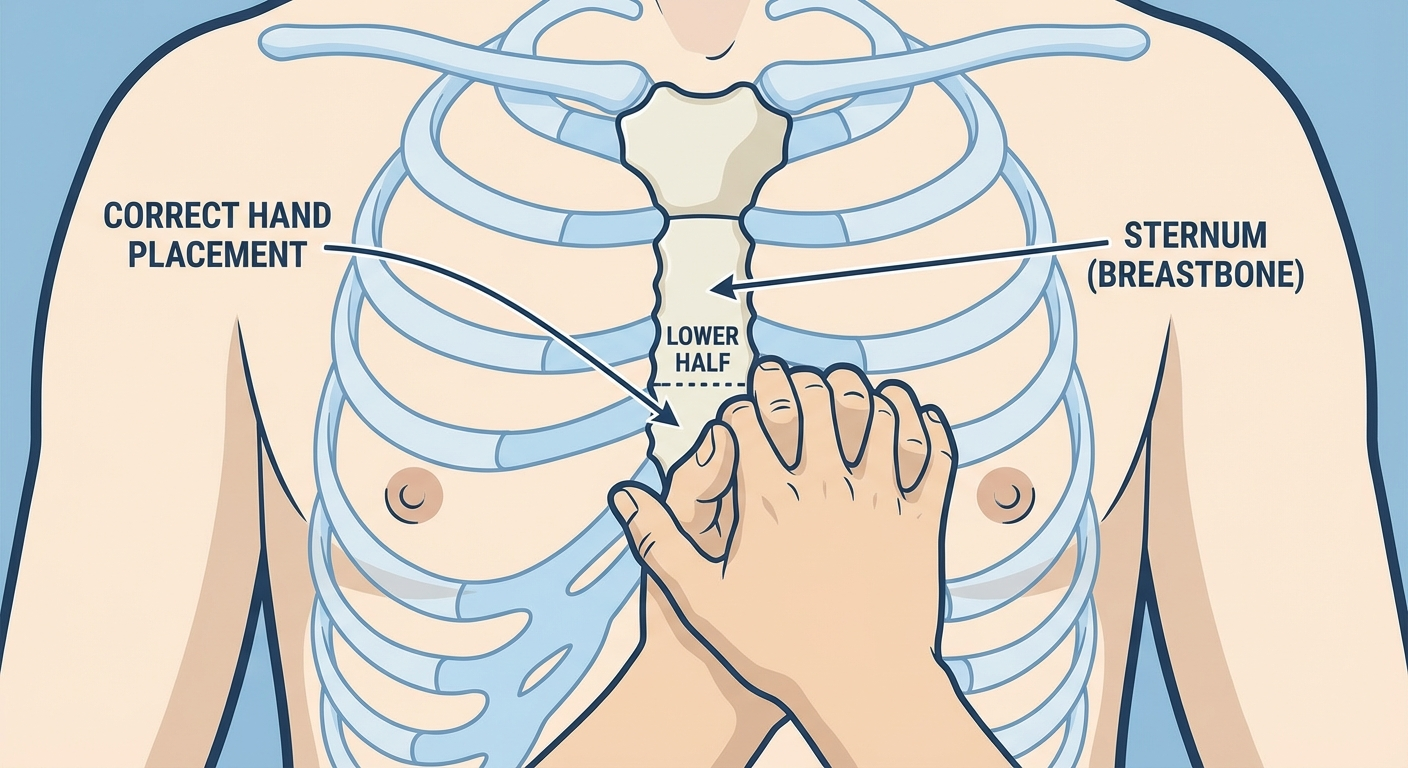
- Kneel beside the person's chest
- Place the heel of one hand on the center of the chest, on the lower half of the breastbone (sternum) — between the nipples
- Place your other hand directly on top of the first hand
- Interlace your fingers and keep them lifted off the chest — only the heel of your bottom hand should contact the chest
- Position your shoulders directly above your hands with your arms straight and elbows locked
Compression technique:
- Push hard: Compress the chest at least 2 inches deep (5 cm) but no more than 2.4 inches (6 cm). Most bystanders do not push hard enough — err on the side of pushing harder.
- Push fast: Maintain a rate of 100 to 120 compressions per minute. A useful mental metronome: push to the beat of the Bee Gees' "Stayin' Alive" or Beyonce's "Crazy in Love" — both songs have a tempo of approximately 100-104 BPM.
- Allow full chest recoil: After each compression, let the chest come all the way back up before pushing down again. Leaning on the chest between compressions reduces blood flow.
- Minimize interruptions: Pauses in compressions — to check for a pulse, switch rescuers, or prepare for rescue breaths — should be less than 10 seconds. The more time spent compressing, the better the outcome.
Count out loud as you compress: "1-and-2-and-3-and-4..." up to 30. This helps you keep the correct rate and know when to stop for rescue breaths.
Step 6: Deliver Rescue Breaths
After 30 compressions, deliver 2 rescue breaths:
- Open the airway again using the head-tilt, chin-lift maneuver
- Pinch the person's nose closed with the hand that is on their forehead
- Create a complete seal over their mouth with your mouth
- Blow steadily for about 1 second — just enough to make the chest visibly rise
- Watch for the chest to fall, then deliver the second breath
- Each breath should take about 1 second — do not over-ventilate
If using a CPR face shield or pocket mask (strongly recommended):
- Place the barrier device over the person's mouth and nose
- Deliver breaths through the one-way valve
- This protects both you and the victim from disease transmission
If the chest does not rise when you deliver a breath:
- Re-tilt the head and try again
- If the chest still does not rise after the second attempt, the airway may be obstructed — continue with compressions (the force of compressions can sometimes dislodge an obstruction)
Important: Do not spend more than 10 seconds on rescue breaths. If you are struggling to get breaths in, return to compressions. Compressions are more important than breaths.
Step 7: Continue CPR Cycles
Continue the cycle of 30 compressions and 2 breaths without stopping until one of the following occurs:
- An AED arrives and is ready to analyze the heart rhythm
- Emergency medical services take over
- The person starts to show signs of life (moving, breathing normally, coughing)
- You are physically exhausted and unable to continue (and no one else is available to take over)
Switching rescuers: If another trained person is available, switch every 2 minutes (approximately 5 cycles of 30:2). Compressor fatigue sets in faster than most people realize — studies show that compression quality begins to decline after just 1 to 2 minutes. The switch should take less than 5 seconds.
Monitor for signs of life during each switch, but do not stop compressions to check unless an AED prompts you to or you see obvious signs of recovery (purposeful movement, normal breathing, coughing).
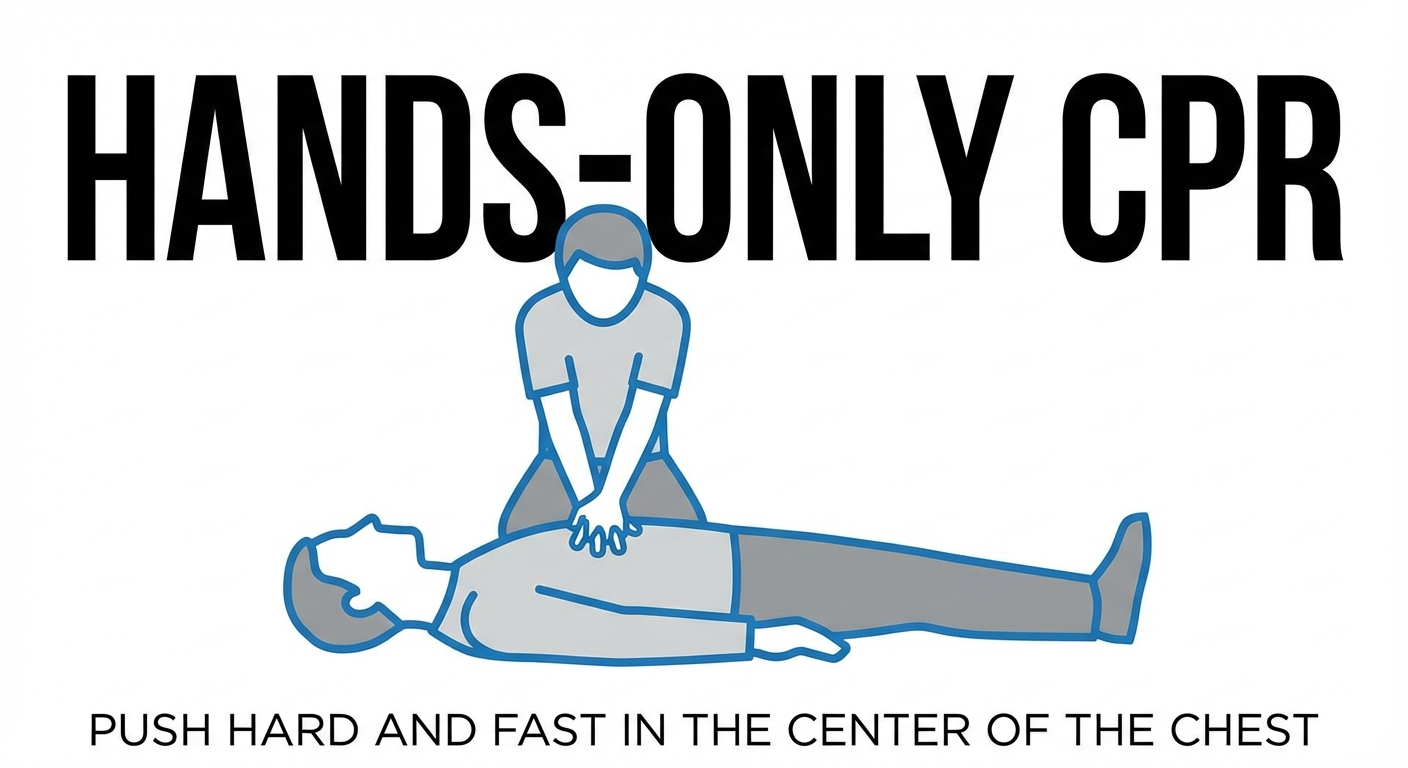
Hands-Only CPR: When and How
In 2008, the American Heart Association began recommending Hands-Only CPR (compressions without rescue breaths) for untrained bystanders, and this recommendation has been reinforced in every guideline update since. Research consistently shows that for adult cardiac arrest witnessed by a bystander, Hands-Only CPR is nearly as effective as conventional CPR with breaths during the first several minutes.
When to use Hands-Only CPR:
- You are not trained in full CPR with rescue breaths
- You are uncomfortable delivering mouth-to-mouth breaths
- You do not have a CPR barrier device and are concerned about disease transmission
- The cardiac arrest appears to be cardiac in origin (the person suddenly collapsed)
When full CPR with breaths is preferred:
- Drowning victims (the primary problem is lack of oxygen)
- Children and infants (their cardiac arrest is usually caused by breathing problems, not heart problems)
- Drug overdose or poisoning
- Choking victims who have become unresponsive
- Prolonged cardiac arrest (more than several minutes have passed)
How to perform Hands-Only CPR:
- Call 911 (or tell someone else to call)
- Push hard and fast in the center of the chest at a rate of 100-120 compressions per minute
- Do not stop until help arrives
That is it. Two steps. No mouth-to-mouth. No counting cycles. Just continuous, hard, fast compressions. The AHA's message is simple: "If you see a teen or adult suddenly collapse, call 911, then push hard and fast in the center of the chest."
The reason Hands-Only CPR works for witnessed adult cardiac arrest is that when the heart first stops, there is still a reservoir of oxygen in the blood. Compressions circulate that oxygenated blood to the brain and heart. For the first several minutes, additional oxygen from rescue breaths adds minimal benefit over compressions alone.
Hands-Only CPR also dramatically increases the likelihood that a bystander will actually attempt CPR. The fear of mouth-to-mouth contact is the number one barrier to bystander CPR. By removing that barrier, Hands-Only CPR saves more lives simply because more people are willing to act.
Using an AED with CPR
An AED (Automated External Defibrillator) is a portable device that analyzes the heart's rhythm and, if appropriate, delivers an electrical shock to restore a normal heartbeat. AEDs are designed for use by anyone — no medical training is required. The device gives clear, step-by-step voice prompts that guide you through the entire process.
AEDs are commonly found in:
- Airports, train stations, and bus terminals
- Gyms and fitness centers
- Schools and universities
- Office buildings and corporate campuses
- Shopping malls and large retail stores
- Community centers, churches, and sports venues
- Apartment building lobbies
Many states require AEDs in public buildings with a certain occupancy level. Look for wall-mounted cases with the universal heart-and-lightning-bolt AED symbol, usually near entrances, elevators, or main hallways.
How to use an AED (step by step):
-
Turn on the AED. Press the power button or open the lid (some models turn on automatically when opened). The device will begin giving voice instructions.
-
Expose the chest. Remove or cut away the person's shirt. The chest must be bare and dry. If the chest is wet (from rain, sweat, or drowning), wipe it dry with a towel or cloth. If there is excessive chest hair, quickly shave the pad areas (AED kits usually include a razor) or press the pads on firmly.
-
Apply the electrode pads. Peel the pads from their backing and place them exactly as shown in the diagrams on the pads:
- Right pad: Upper right chest, below the collarbone, to the right of the breastbone
- Left pad: Lower left side, below the nipple and slightly toward the armpit
- Press the pads firmly to ensure good contact with the skin
-
Clear the person and let the AED analyze. Make sure no one is touching the person. Say loudly: "Everyone clear — analyzing now." The AED will analyze the heart rhythm. This takes about 10 seconds.
-
Follow the AED's instruction:
- If a shock is advised: The AED will charge and tell you to press the shock button. Make absolutely sure no one is touching the person, shout "Clear!" and press the button.
- If no shock is advised: The AED will tell you to resume CPR. Begin compressions immediately.
-
Resume CPR immediately after the shock. Do not check for a pulse after a shock — go straight into 30 compressions and 2 breaths (or continuous compressions for Hands-Only CPR). After 2 minutes, the AED will prompt another rhythm analysis.
-
Continue until EMS arrives. The AED will continue to guide you through analyze-shock-CPR cycles. Do not turn it off or remove the pads.
Important AED notes:
- AEDs will not shock a normal heart rhythm. You cannot accidentally harm someone with an AED by delivering an unnecessary shock — the device makes that decision, not you.
- Remove any medication patches from the chest before applying pads.
- Remove any metal jewelry or necklaces that might contact the pads.
- If the person has an implanted pacemaker or defibrillator (visible as a hard lump under the skin), place the AED pad at least 1 inch away from it.

Common CPR Mistakes and How to Avoid Them
Even trained individuals make mistakes during CPR, especially under the stress of a real emergency. Knowing the most common errors helps you avoid them.
1. Not pushing hard enough
This is the single most common CPR mistake. Studies of real-world CPR show that the majority of bystanders and even some healthcare professionals do not compress deeply enough. You need to compress at least 2 inches — that is deeper than most people expect. You may hear or feel ribs crack. This is normal during proper CPR and should not cause you to ease up. Broken ribs heal. A dead brain does not.
2. Compressing too slowly
The target rate is 100-120 compressions per minute. Many people compress too slowly because they are trying to be careful or rhythmic. Use a mental metronome — the beat of "Stayin' Alive" by the Bee Gees is 104 BPM, which is right in the target range.
3. Not allowing full chest recoil
Between compressions, you must lift your weight completely off the chest so it can return to its normal position. Leaning on the chest — which happens naturally as you fatigue — keeps the heart partially compressed and reduces the blood that refills the heart's chambers. Think of it as a pump: if you never fully release the pump handle, the pump cannot draw in fluid.
4. Interrupting compressions too frequently or too long
Every time you stop compressing, blood pressure drops rapidly and takes several compressions to rebuild. Pauses for rescue breaths should be less than 10 seconds. Pauses to switch rescuers should be less than 5 seconds. Do not stop to re-check for a pulse unless an AED prompts you or you see obvious signs of life.
5. Over-ventilating during rescue breaths
Blowing too hard, too fast, or too many breaths forces air into the stomach (gastric inflation), which can cause vomiting and aspiration. Each breath should last about 1 second — just enough to see the chest rise. Two breaths, not more.
6. Incorrect hand placement
Placing your hands too high on the chest (over the clavicle) or too low (over the xiphoid process at the bottom of the sternum) reduces compression effectiveness and can cause internal injury. The correct position is the center of the chest, on the lower half of the breastbone, between the nipples.
7. Delaying CPR to find equipment
People sometimes waste critical minutes looking for a CPR mask, an AED, or their phone before starting compressions. Start CPR immediately. Have someone else retrieve equipment while you compress. If you are alone, put your phone on speaker and begin compressions while talking to 911.
8. Giving up too soon
CPR is physically exhausting. After a few minutes, your arms burn, your back aches, and the person may show no signs of improvement. Do not stop. Professional resuscitation efforts routinely continue for 30 minutes or more. Switch with another rescuer every 2 minutes if possible, but keep compressions going.
| Mistake | Impact | Fix |
|---|---|---|
| Compressions too shallow | Inadequate blood flow to brain/heart | Push at least 2 inches deep — harder than you think |
| Compressions too slow | Insufficient circulation | Use "Stayin' Alive" tempo (100-120 BPM) |
| Incomplete chest recoil | Reduced cardiac filling | Fully release between each compression |
| Long pauses | Blood pressure drops to zero | Keep pauses under 10 seconds |
| Over-ventilation | Gastric inflation, vomiting risk | 1-second breaths, just until chest rises |
| Wrong hand position | Reduced effectiveness, possible injury | Center of chest, lower sternum, between nipples |
| Delayed start | Every minute reduces survival 7-10% | Start compressions immediately |
| Stopping too early | Patient dies | Continue until EMS arrives or you physically cannot |
When to Stop CPR
Once you start CPR, you should continue until one of the following conditions is met:
1. Emergency medical services arrive and take over care. This is the most common and ideal reason to stop. Paramedics have advanced airway equipment, cardiac drugs, and defibrillators. When they arrive, continue CPR until they explicitly tell you to stop, then brief them on what happened and how long CPR has been in progress.
2. An AED is available and prompts you to stop for rhythm analysis. The AED needs a few seconds of no motion to analyze the heart rhythm. Stop compressions only when the AED instructs you to, then resume immediately after the shock or "no shock advised" prompt.
3. The person shows definite signs of life. If the person starts breathing normally (not agonal gasps), coughing, moving purposefully, or speaking, stop CPR. Place them in the recovery position (on their side) and monitor them closely until EMS arrives. Be prepared to restart CPR if they deteriorate.
4. You are physically exhausted and no one else can take over. CPR is extremely demanding. If you have been compressing for an extended period alone and are no longer able to push hard and fast enough to be effective, it is medically reasonable to stop. This is rare when other bystanders are present because you can rotate.
5. The scene becomes unsafe. If a new hazard emerges — fire spreading, structural collapse, rising water, chemical fumes — your safety takes priority. You cannot help anyone if you become a victim. Move to safety and direct EMS to the person's location.
6. A physician or authorized medical professional pronounces the person dead. Only a physician can legally declare death. Bystanders should not make this determination.
You should NOT stop CPR because:
- You think it has been too long — survival has been documented after 30+ minutes of CPR
- The person has not responded yet — CPR buys time; the AED or hospital intervention is what restores the heartbeat
- You are afraid of legal consequences — every U.S. state has Good Samaritan laws that protect bystanders who perform CPR in good faith
Essential CPR Supplies and Training Equipment
Having the right supplies readily available — and practicing with proper training equipment — dramatically improves your readiness and effectiveness. Here are the essential products every household and workplace should consider.
Single-use barrier devices with one-way valves that protect both rescuer and victim during rescue breathing. Compact enough to keep in a wallet, purse, car glove box, or first aid kit. Every household member should carry one.
Check price on Amazon
A reusable, professional-grade CPR barrier with a one-way valve and oxygen inlet port. Provides a better seal and easier ventilation than flat face shields. Used by lifeguards, nurses, and first responders. Comes in a hard-shell carrying case.
Check price on Amazon
A training-only AED unit that simulates real AED operation with voice prompts, pad placement practice, and scenario modes. Essential for CPR classes, workplace training, and home practice. Does not deliver actual shocks.
Check price on Amazon
Full-torso mannequin with realistic chest compression feedback — audible click when correct depth is reached. Allows practice of head-tilt chin-lift, rescue breaths, and compressions. Available in single-use lung bag models for group training.
Check price on Amazon
A comprehensive first aid kit that includes a CPR pocket mask, nitrile gloves, trauma shears, and other emergency supplies alongside standard wound care items. Ideal for home, office, or vehicle. Look for kits that meet ANSI/ISEA Z308.1 standards.
Check price on Amazon
A small device placed on the chest during training that provides real-time feedback on compression depth, rate, and recoil. Some models connect to smartphone apps for tracking performance over time. Used in professional training programs.
Check price on Amazon
For a complete guide to building your emergency supplies, including the CPR-specific items listed above, see our what every first aid kit should contain article and our best first aid kits for home review.
FAQs
How long should you perform CPR before stopping? You should continue CPR until emergency medical services arrive and take over, an AED becomes available and prompts you, the person shows definite signs of life (normal breathing, purposeful movement), or you are physically unable to continue and no one else can take over. There is no fixed time limit — survival has been documented after 30 or more minutes of continuous CPR.
Can you perform CPR if you are not certified? Yes. Every U.S. state has Good Samaritan laws that protect bystanders who perform CPR in good faith, regardless of certification status. The American Heart Association recommends that untrained bystanders perform Hands-Only CPR (compressions without breaths) — just call 911 and push hard and fast in the center of the chest until help arrives. Certification is strongly recommended for learning proper technique, but lack of certification should never stop you from acting.
What is the correct compression rate for adult CPR? The correct rate is 100 to 120 compressions per minute. This is faster than most people expect. A helpful reference: the song "Stayin' Alive" by the Bee Gees has a tempo of approximately 104 beats per minute, which falls right in the target range. Compressing to this beat helps maintain the correct rate.
Can you break ribs during CPR? Yes, rib fractures are common during CPR, especially in older adults. Studies report rib or sternum fractures in 13 to 97 percent of CPR recipients, depending on the population. While this sounds concerning, it is an expected consequence of effective compressions. Broken ribs heal — a person who dies from cardiac arrest does not recover. Do not let the fear of breaking ribs cause you to compress too lightly.
What is the difference between a heart attack and cardiac arrest? A heart attack occurs when blood flow to a section of the heart is blocked, usually by a clot in a coronary artery. The heart usually keeps beating during a heart attack, though the person may experience chest pain, shortness of breath, and nausea. Cardiac arrest occurs when the heart suddenly stops beating entirely due to an electrical malfunction. CPR is needed for cardiac arrest, not for a heart attack (unless the heart attack leads to cardiac arrest). A heart attack can lead to cardiac arrest, but they are different events.
Should you perform CPR on someone who is breathing? No. If the person is breathing normally, they do not need CPR. Place them in the recovery position (on their side, with the top leg bent forward for stability) and monitor them until EMS arrives. However, if they are only gasping or making occasional snoring sounds (agonal breathing), this is NOT normal breathing — begin CPR immediately.
How deep should chest compressions be for adults? For adults, chest compressions should be at least 2 inches (5 centimeters) deep but no more than 2.4 inches (6 centimeters). Most untrained rescuers do not push hard enough. It takes significant force to compress the chest this deeply — you should use your body weight, not just your arm muscles. Lock your elbows and push straight down from your shoulders.
Is mouth-to-mouth still recommended during CPR? Mouth-to-mouth (rescue breathing) is still part of full CPR training and is recommended for trained rescuers who are willing and able to provide it, especially for drowning victims, children, and prolonged cardiac arrest. However, for untrained bystanders or those unwilling to provide mouth-to-mouth, Hands-Only CPR (compressions only) is the recommended approach for witnessed adult cardiac arrest and has been shown to be nearly as effective in the first several minutes.
Author Bio
Dr. Karen Walsh is a board-certified emergency medicine physician with over 18 years of clinical experience in Level I trauma centers. She serves as a medical advisor for several national CPR education programs and has trained thousands of healthcare professionals and lay rescuers in basic and advanced life support. Dr. Walsh is an active member of the American College of Emergency Physicians (ACEP) and a certified AHA instructor. She is passionate about making life-saving skills accessible to everyone through clear, evidence-based education.
Sources and Methodology
This article was compiled using guidelines and recommendations from the following authoritative sources:
- American Heart Association (AHA) — 2025 Guidelines Update for CPR and Emergency Cardiovascular Care (ECC). These guidelines form the foundation of CPR training programs worldwide and are updated every five years based on the International Liaison Committee on Resuscitation (ILCOR) systematic evidence reviews.
- American Red Cross — First Aid/CPR/AED Participant's Manual (2024 edition) and official CPR training curriculum for lay rescuers and professional responders.
- International Liaison Committee on Resuscitation (ILCOR) — Consensus on Science with Treatment Recommendations (CoSTR), the evidence base underlying AHA and ERC guidelines.
- European Resuscitation Council (ERC) — 2025 Guidelines for Resuscitation, providing an international perspective on CPR best practices.
- Sasson et al., "Predictors of Survival From Out-of-Hospital Cardiac Arrest," Circulation: Cardiovascular Quality and Outcomes, 2010. Landmark meta-analysis demonstrating the survival benefit of bystander CPR.
- Kleinman et al., "2017 AHA Focused Update on Adult Basic Life Support," Circulation, 2017. Key update reinforcing Hands-Only CPR recommendations and compression quality metrics.
- Bobrow et al., "Chest Compression-Only CPR by Lay Rescuers and Survival from Out-of-Hospital Cardiac Arrest," JAMA, 2010. Evidence supporting Hands-Only CPR effectiveness for witnessed adult cardiac arrest.
- National Safety Council — Workplace safety statistics, cardiac arrest data, and AED placement guidelines.
- Stop the Bleed Campaign / Department of Homeland Security — Public education guidelines for emergency response readiness.
All product recommendations are based on editorial evaluation of functionality, durability, user reviews, and value for CPR preparedness. Product prices and availability are subject to change. Affiliate links are clearly marked and help support the ongoing maintenance of firstaidkitspot.com at no additional cost to you.