How to Treat a Deep Cut Without Going to Hospital (2026)
By Marcus Reid, Paramedic and First Aid Instructor • Published 4/26/2026

How to Treat a Deep Cut Without Going to Hospital (2026)
A deep cut can happen in an instant — a kitchen knife slips, a tool bites, a fall scrapes skin against a rough edge. The question that follows is urgent: do you need a hospital, or can you handle this at home? In most cases where the bleeding can be controlled and the wound is not excessively deep, you can treat a deep cut without going to hospital. This guide walks you through every step with the precision of an emergency paramedic and the clarity every adult needs in a stressful moment.
Last updated: April 2026
Table of Contents
- Assessing Whether You Need Hospital Care
- When Butterfly Closures Are Enough — And When They Are Not
- Step 1: Stop the Bleeding
- Step 2: Clean the Wound Thoroughly
- Step 3: Assess Depth and Decide Whether to Close the Cut
- Step 4: Close the Cut at Home
- Step 5: Dress and Protect the Wound
- Step 6: Manage Pain and Monitor for Infection
- Tetanus Risk Assessment: When to See a Doctor for a Booster
- Signs of Infection: Red Flag Section
- When to Go to the ER vs Urgent Care
- Wound Care Aftercare: Days 1 Through 14
- Scar Prevention: Minimising Permanent Marks
- Healing Timeline: What to Expect
- Building Your Wound Care Kit
- Frequently Asked Questions
- Sources & Further Reading
Assessing Whether You Need Hospital Care
Not every deep cut belongs at home. The first and most important step is an honest assessment. Knowing when a wound exceeds home treatment limits saves lives and prevents permanent damage.
Go to hospital immediately if any of the following apply:
- Bleeding does not slow or stop after 15 minutes of firm, continuous direct pressure
- The cut is longer than 2.5 cm (1 inch) and gapes open
- You can see bone, muscle, tendon, or fat exposed inside the wound
- The cut is on the face, scalp, hands, feet, genitals, or over a joint
- You cannot fully clean debris (glass, metal, dirt) embedded in the wound
- The wound was caused by an animal bite, human bite, or a rusty/contaminated object
- You notice numbness or loss of movement below the injury site
- The person has a bleeding disorder (haemophilia) or is on blood thinners
- It has been more than 6-8 hours since the injury and the wound is not yet treated
- You cannot remember when the person's last tetanus shot was (or it was more than 10 years ago)
- You cannot fully straighten or bend a finger, toe, or joint near the wound
If none of the above apply, and you have a well-stocked first aid kit, proceed with confidence. The rest of this guide covers exactly what to do.
For other common first aid emergencies, see our guide on how to treat a burn at home and how to treat open blisters.
When Butterfly Closures Are Enough — And When They Are Not
This is one of the most common questions in home wound care, and the answer requires understanding what butterfly bandages can and cannot do.
Butterfly adhesive bandages (also called Steri-Strips or butterfly closures) can adequately close:
- Superficial cuts where the skin edges meet naturally when held together
- Cuts that gape less than 5mm at the widest point
- Cuts on flat surfaces away from joints — arms, legs, torso
- Cuts where only the surface skin layer is involved — no visible fat or muscle
Butterfly bandages CANNOT adequately close:
- Cuts where you can see yellow fatty tissue beneath the skin surface
- Cuts on joints (fingers, elbows, knees, ankles) — skin stretches too much
- Cuts longer than 2.5 cm (1 inch) — the tension exceeds what adhesive can hold
- Wounds more than 6-8 hours old — tissue begins to swell and edges become inflamed
- Deep puncture wounds (animal bites, nails) — these carry a high infection risk from bacteria pushed deep into tissue
When in doubt, treat the wound as an open wound (clean, dress, let it heal from the bottom up) rather than risking a closed wound that becomes infected underneath the closure. An open wound that heals slowly is far preferable to a closed wound that develops a deep abscess.
INTERNAL LINK: when to use butterfly bandages vs stitches — Our detailed guide explaining the decision criteria in more depth.
Step 1: Stop the Bleeding
Controlling bleeding is always the first priority. Once blood is flowing freely, it is harder to see what you are dealing with, and significant blood loss is a medical emergency in its own right.
The Direct Pressure Method
- Don disposable gloves if available. Blood-borne pathogen protection matters even with people you know.
- Apply a clean cloth, sterile gauze pad, or even a clean t-shirt directly over the wound. Do not use a highly absorbent material that will stick to the wound (avoid paper towels directly on open tissue).
- Press down firmly with your palm. Use enough pressure that you would expect to leave a slight impression on your own skin.
- Hold constant, uninterrupted pressure for 10-15 minutes. Do not lift the cloth to check progress. Lifting breaks the clotting process and restarts bleeding.
- If blood soaks through the cloth, add additional layers on top rather than removing the original dressing.
- Once bleeding has noticeably slowed or stopped, secure the dressing with paper tape before releasing pressure.
Figure 1: Correct hand positioning for applying direct pressure to a deep cut
When to Use a Pressure Bandage
If the bleeding slows but does not fully stop, move to a pressure bandage:
- Wrap roll gauze firmly around the gauze pad already on the wound
- Do not cut off circulation — you should still be able to slip a finger underneath
- The bandage should be snug but not cause numbness or colour change in the surrounding skin
When NOT to Use a Tourniquet
Tourniquets are for life-threatening limb haemorrhage only — situations where blood is spurting or pouring and direct pressure has failed. Applying a tourniquet incorrectly can cause permanent nerve and tissue damage. Unless you have been trained in proper tourniquet application, do not use one.
For more on bleeding control techniques, see our complete guide to emergency bleeding control techniques.
Step 2: Clean the Wound Thoroughly
Once bleeding is controlled, the wound must be cleaned properly before any closing or dressing is applied. Inadequate cleaning is the primary cause of wound infections that develop days after the initial injury.
Irrigation: The Gold Standard
Running water is the single most effective cleaning method available at home.
- Hold the wound under clean, cool running tap water for 5-10 full minutes.
- If you have a wound irrigation syringe or a clean bulb syringe, use it to squirt water directly into the wound with pressure. This physically dislodges bacteria and debris that water alone cannot remove.
- Allow water to run over and through the wound — do not scrub aggressively. Gentle agitation is sufficient.
Figure 2: Wound irrigation technique using a syringe to flush debris from a deep cut
What About Soap?
Use mild soap on the skin surrounding the wound edges only. Do not pour liquid soap directly into an open cut — soap inside the wound causes irritation and can delay healing. Rinse the soap off thoroughly with clean water.
Antiseptic Application
After irrigation, apply an antiseptic solution to the wound margins and surrounding skin:
- Povidone-iodine (Betadine): Effective broad-spectrum antiseptic. Dilute with an equal part of clean water if the wound is large.
- Chlorhexidine (Hibiclens): Another excellent option. Do not use on open wounds larger than a few square centimetres as systemic absorption can occur.
Avoid putting hydrogen peroxide or undiluted iodine directly inside a deep wound. These damage the granulation tissue that your body needs to rebuild — they kill bacteria, but they also kill the cells doing the healing work.
Removing Embedded Debris
If you can see debris (dirt, glass, sand) in the wound:
- Use sterile tweezers cleaned with antiseptic
- Gently tease out visible particles — never push debris deeper
- If an object is deeply embedded or resistant, leave it and seek medical care — attempting forceful removal can cause more bleeding and damage
- After debris removal, re-irrigate the wound for another 2-3 minutes
For animal bites and puncture wounds that carry a high infection risk, see our complete first aid for animal bites guide.
Step 3: Assess Depth and Decide Whether to Close the Cut
With the wound clean and bleeding stopped, you can now assess whether it should be closed at home or left to heal open under a dressing.
Closure vs. Healing Open
| Factor | Can Close at Home | Leave Open / Seek Care |
|---|---|---|
| Width of gap | Under 5mm, edges touch easily | Over 5mm, edges do not meet |
| Depth | Superficial, through skin only | Through fat, muscle, or bone visible |
| Location | Flat surfaces (arms, legs, torso) | Over joints, face, hands, feet |
| Cleanliness | Clean mechanism, no debris | Dirty wound, embedded foreign material |
| Age of wound | Under 6-8 hours | More than 6-8 hours old |
| Edge quality | Clean, straight edges | Jagged, crushed, irregular edges |
If your cut does not meet all the "close at home" criteria, proceed to Step 5 (dressing) and treat it as an open wound. Open wounds heal more slowly but carry a significantly lower infection risk when not properly closed.
Step 4: Close the Cut at Home
When the wound meets the criteria above, closing the edges brings them together, reduces healing time, and minimises scarring. Several options exist for home wound closure.
Option A: Butterfly Adhesive Bandages (Steri-Derm or Generic)
These are the most accessible and easiest to use for non-medical practitioners.
- Clean and dry the wound completely — moisture prevents adhesion
- Close the wound edges together with your fingers so the skin edges meet naturally
- Apply one butterfly bandage perpendicular to the cut, at the midpoint
- Apply additional butterfly bandages spaced 3-5mm apart, alternating to each side
- Do not stretch the bandage over the wound — lay it gently so the wound edges are held but not compressed

Figure 3: Applying butterfly bandages to hold wound edges together — note the perpendicular placement and spacing
Option B: Liquid Wound Adhesive (Dermabond-style)
Available at pharmacies, liquid adhesive seals the wound within 30-60 seconds of application.
- Ensure the wound is completely dry
- Pinch wound edges together
- Apply a thin layer of adhesive over the closed wound
- Allow to fully dry before releasing pressure (about 60 seconds)
- Apply a second coat if directed by product instructions
Do not use liquid adhesive on wounds that are still bleeding, on infected wounds, or on areas of high skin tension (knuckles, joints) without professional guidance.
Option C: Adhesive Steri-Strips
Steri-Strips are paper-like tapes that hold wound edges together with less tension than butterfly bandages.
- Dry the skin around the wound
- Peel one Steri-Strip and position it across the wound, holding edges together
- Press firmly along the full length of the strip
- Space additional strips 3-5mm apart
Step 5: Dress and Protect the Wound
A proper wound dressing keeps the area clean, maintains the correct moisture balance for healing, and protects the closure method from being disturbed.
Dressing Protocol
- Apply a thin layer of antibiotic ointment (such as Neosporin — Amazon link, tag=theforge05-20) to the wound surface. This keeps the wound moist and has a mild antibacterial effect.
- Cover with a non-stick sterile gauze pad — the pad side faces the wound, not the shiny side.
- Secure with paper tape or a conforming bandage. Paper tape is preferred because it is gentle on healing skin and easy to remove.
- Change the dressing every 24 hours, or sooner if it becomes wet, soiled, or loose.
Figure 4: The three-layer wound dressing technique — ointment, non-stick pad, and paper tape securing
Wet Healing vs. Dry Healing
Research published in the Journal of Tissue Viability and supported by the Wound Healing Society consistently shows that moist wound healing (keeping the wound slightly moist with ointment and a non-stick dressing) results in:
- Up to 50% faster epithelialisation (new skin growth)
- Reduced scab formation and less scarring
- Lower infection rates compared to air-drying
Keep your wound covered and slightly moist for the first 3-5 days, then transition to a lighter dressing or adhesive bandage as the wound closes.
Step 6: Manage Pain and Monitor for Infection
Pain Management
- Paracetamol (acetaminophen) is the preferred pain reliever for wound pain — it is effective and does not increase bleeding risk.
- Ibuprofen (Advil, Nurofen) provides both pain relief and anti-inflammatory effect. It is safe for most adults but avoid if you have stomach ulcers or kidney issues.
- Avoid aspirin after a significant wound — it inhibits platelet function and can prolong bleeding.
Tetanus Risk Assessment: When to See a Doctor for a Booster
Tetanus is a serious bacterial infection (caused by Clostridium tetani) that enters the body through wounds contaminated with soil, rust, or faeces. The bacteria produce a toxin that causes painful muscle spasms and can be fatal.
When Is Tetanus a Real Risk?
A tetanus-prone wound is defined as:
- Wounds caused by rusty nails, metal shards, thorns, or animal bites
- Wounds with dead tissue or devitalised tissue (crush injuries, burns)
- Wounds that have been exposed to soil, manure, or foreign material
- Puncture wounds where bacteria can be pushed deep into tissue
- Wounds that were not properly cleaned within a few hours
Tetanus Vaccination Schedule
| Vaccination Status | Dirty/Tetanus-Prone Wound | Clean Wound |
|---|---|---|
| Unknown or <3 doses | Tetanus immunoglobulin + vaccine | Give vaccine |
| 3+ doses, last >10 years ago | Give vaccine | Give vaccine if >10 years |
| 3+ doses, last <10 years ago | Possibly give vaccine (check with doctor) | No action needed |
If your last tetanus shot was more than 10 years ago and your wound is dirty or was caused by a potentially contaminated object, contact your doctor about a booster. The tetanus vaccine booster is effective even when given within 48-72 hours of the injury, though earlier is better.
If you have never received a tetanus series (or cannot confirm it), seek medical attention promptly — you may need tetanus immunoglobulin (TIG), which provides immediate passive protection.
INTERNAL LINK: tetanus vaccination schedule guide — Full breakdown of tetanus risk, vaccination schedules, and when to seek medical care.
Signs of Infection: Red Flag Section
Monitor the wound vigilantly for the first 7-10 days. Contact a doctor immediately if you notice any of the following:
Normal healing (days 1-3):
- Mild redness immediately around the wound edges
- Slight swelling
- Clear or pale-yellow drainage
- Mild tenderness
Warning signs — Act immediately (days 3+):
- Increasing pain rather than decreasing tenderness
- Spreading redness that moves beyond the immediate wound edges
- Warmth in the skin around the wound (it feels hot to touch)
- Swelling that worsens rather than gradually reducing
- Cloudy, yellow, green, or bloody drainage — especially if it has an odour
- Red streaks extending outward from the wound (lymphangitis — infection spreading through lymph channels)
- Fever above 38°C / 100.4°F
- Pus visible in or around the wound
Critical emergency signs — Call 000 (AU) or 911 (US) immediately:
- Rapid breathing or racing heart
- Confusion or altered mental state
- Very high or very low temperature
- Wound site that is intensely painful, swollen, and feels hard to the touch (possible necrotising fasciitis — a surgical emergency)
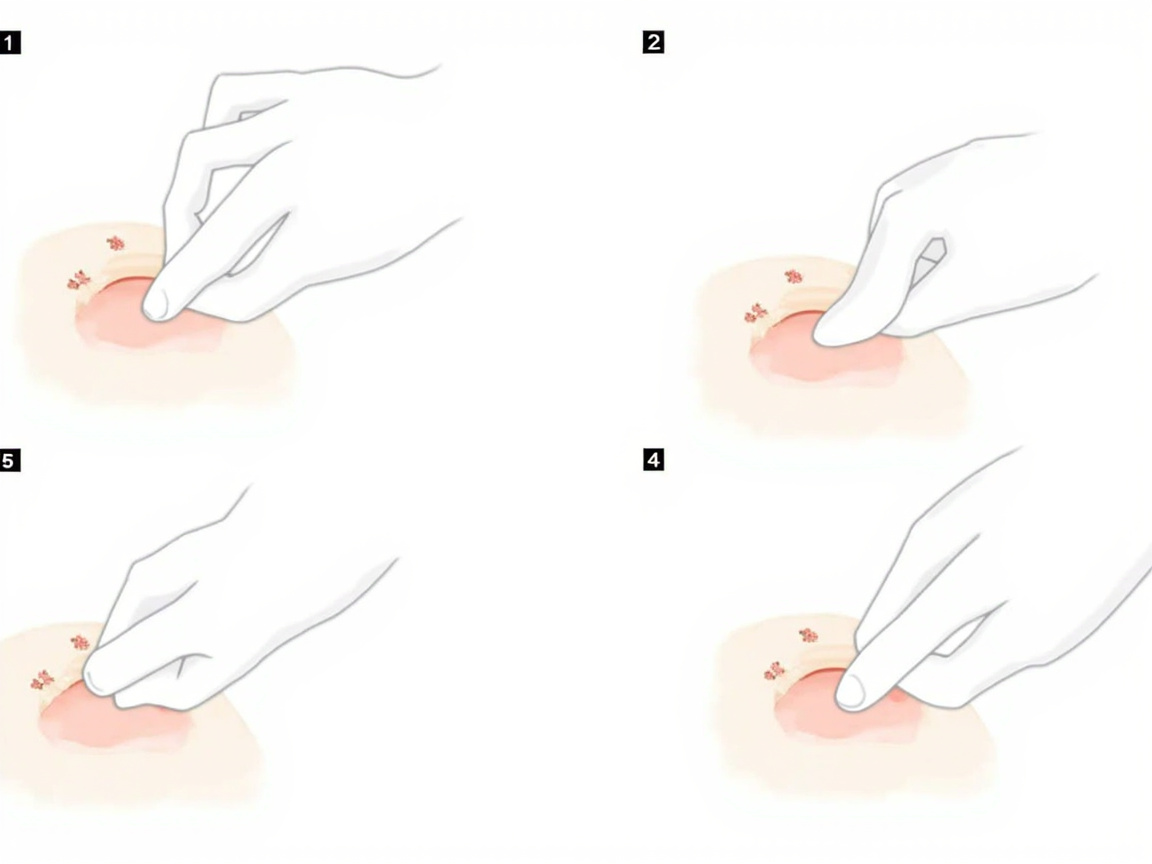
Figure 5: Visual comparison of normal healing progression versus signs of wound infection
When to Go to the ER vs Urgent Care
Not all medical facilities are the same. Choosing correctly affects how quickly you are seen and how much it costs.
Go to the Emergency Department (ER) If:
- The cut is on the face, scalp, hands, or over a joint
- You can see bone, tendon, or muscle in the wound
- The wound is from an animal or human bite
- You cannot stop the bleeding after 15+ minutes of pressure
- The person has signs of sepsis (fever, rapid breathing, confusion, racing heart)
- You suspect a deep puncture (rusty nail through a shoe) — these carry very high infection risk
- There is numbness or loss of movement below the injury site
Visit an Urgent Care Centre If:
- The cut is longer than 1 inch and may need sutures but does not involve the above criteria
- You cannot remove debris embedded in the wound
- The person needs a tetanus booster (if your GP is unavailable)
- The wound is on the body or limbs (not face, hands, joints)
- You need professional wound closure (butterfly bandages insufficient)
INTERNAL LINK: when to go to ER vs urgent care vs GP — Detailed decision guide for the right level of care.
Wound Care Aftercare: Days 1 Through 14
Day 1-3: The Inflammatory Phase
- Keep the dressing on for a full 24 hours after the initial treatment
- If the wound is closed with butterfly bandages or adhesive, keep it dry for 24-48 hours
- If the wound is healing open (left to close by secondary intention), change the dressing daily
- Take paracetamol for pain; avoid ibuprofen in the first 48 hours if bleeding was significant (ibuprofen can impair platelet function)
- Do not submerge the wound in water — no baths, swimming pools, or spa baths
Day 4-7: The Proliferative Phase Begins
- You may transition to a lighter dressing if the wound surface is already closed
- If closed with butterfly bandages and the edges remain together, leave them in place for up to 7 days
- If the wound was left open, continue cleaning with saline or clean running water and apply antibiotic ointment
- Gently wash around the wound with mild soap — do not scrub the healing wound surface
- Mild itching is normal and signals healing; do not scratch
Day 7-14: Closing and Remodelling Begins
- If butterfly bandages have been in place for 7 days, they can be removed gently
- If the wound is fully closed, you can stop dressing it but keep it clean and dry
- If the wound was deeper and healing from the bottom up, continue dressing until a fresh layer of skin has formed
- Protect the wound from sun exposure — UV light on healing skin causes permanent pigmentation changes
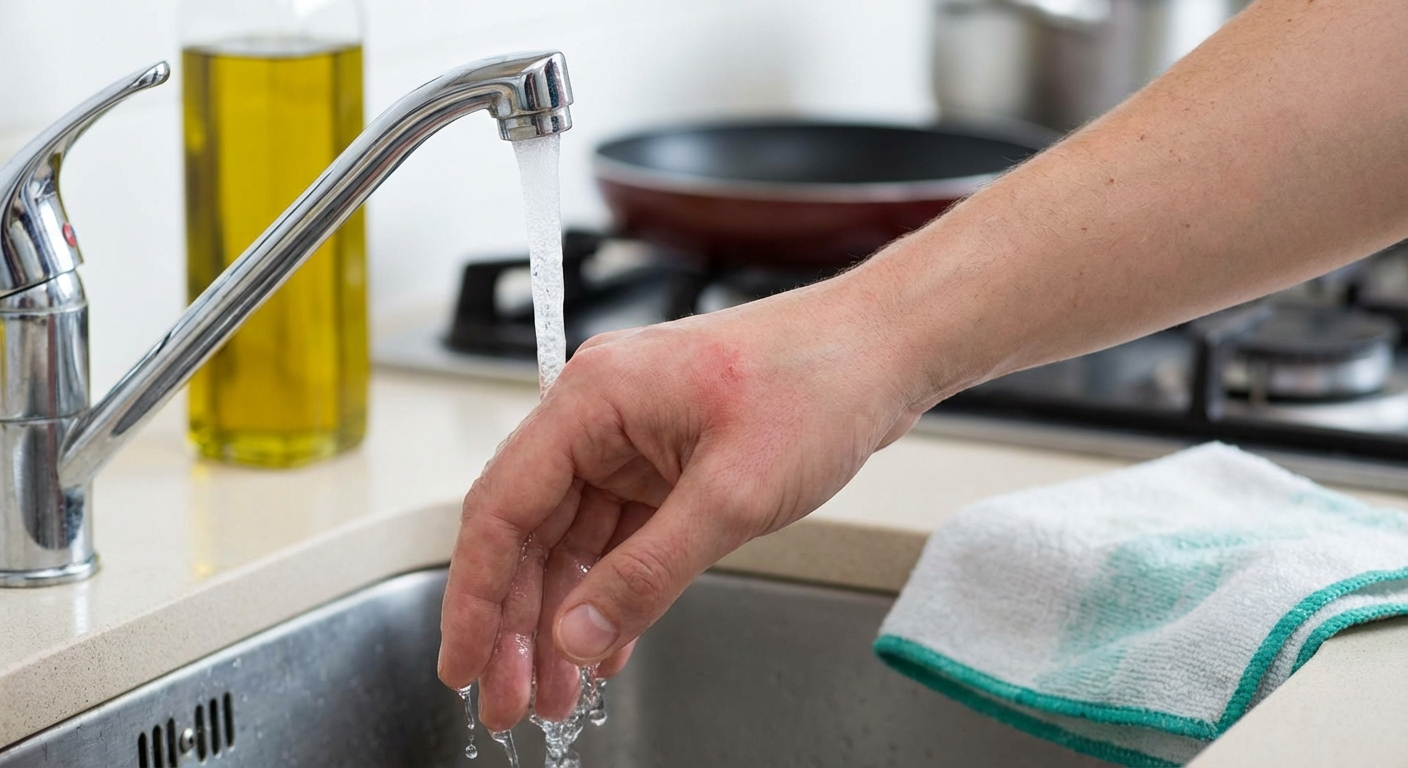
Figure 6: The four phases of wound healing — from initial haemostasis through to collagen remodelling over months
Scar Prevention: Minimising Permanent Marks
Almost every wound that extends through the full thickness of the skin will leave some scar. The visibility and severity of the scar depends on genetics, wound care, and how the wound was originally treated.
Proven Scar Minimisation Strategies
During the healing phase (weeks 1-6):
- Keep the wound moist with petroleum jelly (or a silicone-based scar gel once closed) and covered for at least 5-7 days. Moist wounds heal with a flatter, narrower scar than dry wounds.
- Avoid tension on the wound — do not stretch, pull, or stress the area while it is healing. Wounds on joints are particularly prone to widened scars from movement.
- Do not pick at scabs — they are protecting the new tissue beneath. Let them fall off naturally.
After the wound has fully closed (weeks 6-12+):
- Apply sunscreen (SPF 30+) to the healing scar whenever it will be exposed to sunlight. UV exposure during the first 6 months causes permanent darkening of the scar tissue.
- Silicone scar sheets or gels applied once or twice daily for 8-12 weeks can measurably improve scar appearance. Mederma Advanced Scar Gel and ScarAway silicone sheets are widely available and have solid clinical evidence.
- Massage the scar gently with your fingertip for 2-3 minutes, 2-3 times a day, once the wound has fully epithelialised (new skin has covered the surface). Circular motions and cross-grain techniques break down disorganised collagen and flatten the scar.
- Stay hydrated and maintain good nutrition — vitamin C, zinc, and adequate protein all support the collagen remodelling phase of healing.
When to See a Dermatologist About Scarring
If after 3 months your scar is raised, red, itchy, or particularly visible, a dermatologist can discuss:
- Corticosteroid injections to flatten raised (hypertrophic) scars
- Laser therapy to reduce redness and pigmentation
- Surgical scar revision in cases where a scar has healed poorly and can be improved with a formal revision
For more on managing back pain during recovery (if your injury affects your ability to move comfortably), see our guide to lower back pain relief.
Healing Timeline: What to Expect
Understanding the biology of wound healing helps you know what is normal and what is not.
| Phase | Timing | What Happens | What to Do |
|---|---|---|---|
| Haemostasis | 0-15 minutes | Blood clot forms; bleeding stops | Maintain pressure, apply dressing |
| Inflammatory | Day 1-3 | Swelling, redness, some pain; white blood cells clean the wound | Keep dressing on, take paracetamol if needed |
| Proliferative | Day 4-21 | New tissue (granulation) fills the wound; pink/red colour | Apply antibiotic ointment, change dressing daily |
| Remodelling | Week 3 - 1 year | Collagen remodels; scar flattens and fades | Protect from sun, massage scar after fully closed |
Will There Be a Scar?
A well-cared-for wound that never infected typically produces a thin, pale scar. A wound that became infected often heals with a raised, darker scar. Genetics play a significant role — some people are predisposed to prominent scarring (keloid formation). If you have a known history of keloid scars, discuss this with your doctor at the time of injury as early interventions can help.
Building Your Wound Care Kit
The best time to prepare for a deep cut is before it happens. A properly stocked wound care kit makes home treatment genuinely safe rather than a stressful improvisation.
Essential Supplies
| Item | Purpose | Buy |
|---|---|---|
| Nitrile disposable gloves (box of 100) | Pathogen protection | Amazon, tag=theforge05-20 |
| Sterile gauze pads 10×10cm (pack of 50) | Wound coverage and pressure | Amazon, tag=theforge05-20 |
| Roll gauze and paper tape | Securing dressings | Amazon, tag=theforge05-20 |
| Wound irrigation syringe 60ml | Deep wound cleaning | Amazon, tag=theforge05-20 |
| Butterfly bandages / Steri-Strips | Home wound closure | Amazon, tag=theforge05-20 |
| Povidone-iodine antiseptic | Wound cleaning | Amazon, tag=theforge05-20 |
| Antibiotic ointment (Neosporin) | Moist healing, infection prevention | Amazon, tag=theforge05-20 |
| Sterile tweezers | Debris removal | Amazon, tag=theforge05-20 |
| Trauma shears | Cutting bandages and clothing | Amazon, tag=theforge05-20 |
| First aid instruction manual | Emergency reference | Amazon, tag=theforge05-20 |
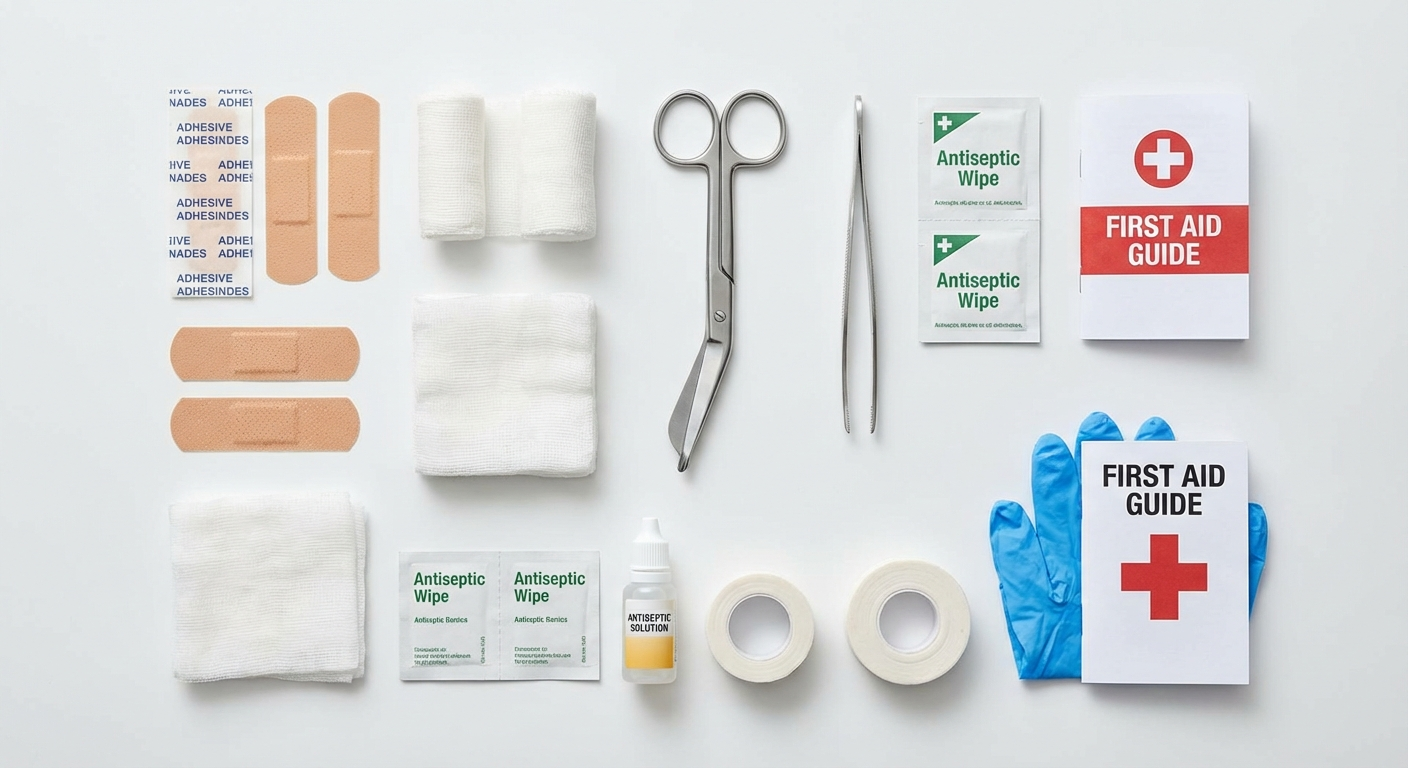
Figure 7: A well-organised home first aid kit stocked with essential wound care supplies
Where to Keep Your Kit
- Kitchen: Primary location — most cuts happen during food preparation
- Garage/workshop: If you use tools
- Car: For travel and outdoor activities
- Camping/bushwalking: Always include a compression bandage and emergency blanket
Check your kit every 6 months. Replace any items that have passed their expiry date, particularly antiseptic solutions and antibiotic ointments, which lose potency over time.
Frequently Asked Questions
When should you seek hospital care for a deep cut instead of treating it at home?
Seek hospital care if bleeding does not stop after 15 minutes of direct pressure, if the cut is longer than 1 inch or exposes bone, muscle, or tendon, if there is debris embedded in the wound, if the wound shows signs of infection (increasing redness, swelling, warmth, pus), if you cannot feel parts of the body below the cut, if you cannot move joints normally, or if the cut was caused by an animal or human bite.
How do you stop heavy bleeding from a deep cut at home?
Apply firm, direct pressure to the wound using a clean cloth, gauze, or bandage. Maintain constant pressure for at least 10-15 minutes without lifting to check. If blood soaks through, add more layers on top rather than removing the original layer. Once bleeding slows, secure the dressing with paper tape before cleaning the wound.
How do you properly clean a deep cut to prevent infection?
Rinse the wound under clean running water for 5-10 minutes to flush out debris. Use mild soap around the wound edges but avoid getting soap inside the cut. Gently pat dry with a clean gauze pad. Apply an antiseptic like povidone-iodine or chlorhexidine around (not inside) the wound. Avoid hydrogen peroxide or iodine directly inside the wound as they can damage tissue.
Should you close a deep cut with butterfly bandages, glue, or Steri-Strips?
For shallow cuts under 1cm that are not gaping, butterfly bandages or Steri-Strips can hold the edges together. Liquid adhesive can be used for clean cuts under 1 inch. For deep cuts that gape open more than 5mm, or cuts on joints, seek professional medical care rather than closing at home as improper closure increases infection risk.
How do you know if a deep cut is infected and what should you do?
Signs of infection include: increasing pain after 24-48 hours, spreading redness around the wound, warmth around the wound site, swelling that worsens, pus or cloudy fluid draining from the cut, red streaks extending from the wound, fever above 38°C (100.4°F), or foul odour from the wound. If any of these appear, see a doctor immediately as you may need oral antibiotics.
How long does a deep cut take to heal without stitches?
A deep cut left to heal without stitches typically takes 2-4 weeks for the surface skin to close. However, deeper tissue layers can take 6-8 weeks or longer to fully repair. Keeping the wound moist with petroleum jelly and covered with a sterile dressing helps tissue regenerate faster and reduces scarring compared to air-drying.
What supplies should be in a first aid kit for treating deep cuts at home?
An adequate first aid kit should contain: sterile gauze pads (multiple sizes), roll gauze and paper tape, butterfly bandages or Steri-Strips, antiseptic solution (povidone-iodine or chlorhexidine), antibiotic ointment like Neosporin, disposable gloves, a wound irrigation syringe or bulb, tweezers for debris removal, scissors, and a thermal blanket for shock. Restock consumables after every use.
When should I get a tetanus shot after a deep cut?
If your wound was caused by a dirty, rusty, or contaminated object and your last tetanus booster was more than 10 years ago, contact your doctor. A tetanus booster within 48 hours of injury can still provide protection. If you have never had a tetanus series or your vaccination history is unknown, seek medical attention promptly.
How do I prevent scarring from a deep cut?
To minimise scarring: keep the wound moist with petroleum jelly and covered for the first 5-7 days, protect the healing wound from UV sunlight once it has closed, massage the scar gently once fully healed (after 3-4 weeks), avoid picking at scabs, and consider silicone scar sheets or gels for prominent scars after the wound has fully epithelialised.
What is the difference between a butterfly bandage and stitches — when is each appropriate?
Butterfly bandages hold the surface skin edges together for shallow cuts that gape less than 5mm. Stitches (sutures) close deeper layers of tissue — muscle and fascia — that butterfly bandages cannot reach. A cut that is deep enough to see fat or muscle beneath the skin surface needs professional closure, not butterfly bandages. Joints, face wounds, and cuts over 1 inch long typically require professional medical care.
Sources & Further Reading
-
Wound Healing Society — Guidelines for moist wound healing and wound care protocols. Available at: https://www.woundhealing.org
-
Australian Red Cross First Aid Guidelines (2021) — Updated guidelines for bleeding management and wound care in pre-hospital settings.
-
Cochrane Database of Systematic Reviews — "Topical antibiotics for preventing surgical site infection" (2019). Available at: https://www.cochranelibrary.com
-
St John Ambulance Australia — First aid for cuts, wounds, and bleeding. Available at: https://www.stjohn.org.au
-
British Red Cross — The Wirripangi Agreement on first aid education standards and wound management protocols.
-
American College of Emergency Physicians (ACEP) — Clinical policy on wound management and tetanus prophylaxis in the emergency department (2020).
-
Journal of Tissue Viability — "Moist wound healing compared with traditional dry healing: a systematic review" (2019).
-
World Health Organization (WHO) — WHO Surgical Site Infection Prevention Guidelines (2018), which include wound care protocols applicable to community settings. Available at: https://www.who.int
This article is for informational purposes only and does not constitute professional medical advice. Always seek qualified medical care when dealing with serious injuries. When in doubt, contact a medical professional or attend your nearest emergency department.
About the Author
Marcus Reid is a qualified paramedic and certified first aid instructor with over 14 years of experience in emergency medical services and community first aid education. He has trained thousands of Australians in practical first aid skills and is a strong advocate for building first aid confidence in the home. Marcus writes evidence-based first aid content to help everyday people handle common emergencies with knowledge and calm.